GitLab is a repository manager and DevOps platform that allows developers to build and deliver secure software quickly. It offers tools to automate the development process – from building, to testing, to deployment. It has version control and issue tracking capability to manage source code changes and monitor issues, bugs, and feature requests. If you are looking for an all-in-one DevOps platform, then GitLab is the best choice for you.
Step 1 – Install GitLab CE
First, install the necessary dependencies using the following command.
apt install ca-certificates postfix -y
Next, add the GitLab CE repository with the following command.
curl -sS https://packages.gitlab.com/install/repositories/gitlab/gitlab-ce/script.deb.sh | bash
Next, install GitLab CE using the following command.
apt install gitlab-ce -y
Once GitLab CE is installed, you will see the following output.
It looks like GitLab has not been configured yet; skipping the upgrade script.

       *.                  *.
      ***                 ***
     *****               *****
    .******             *******
    ********            ********
   ,,,,,,,,,***********,,,,,,,,,
  ,,,,,,,,,,,*********,,,,,,,,,,,
  .,,,,,,,,,,,*******,,,,,,,,,,,,
      ,,,,,,,,,*****,,,,,,,,,.
         ,,,,,,,****,,,,,,
            .,,,***,,,,
                ,*,.


     _______ __  __          __
    / ____(_) /_/ /   ____ _/ /_
   / / __/ / __/ /   / __ `/ __ \
  / /_/ / / /_/ /___/ /_/ / /_/ /
  \____/_/\__/_____/\__,_/_.___/


Thank you for installing GitLab!
GitLab was unable to detect a valid hostname for your instance.
Please configure a URL for your GitLab instance by setting `external_url`
configuration in /etc/gitlab/gitlab.rb file.
Then, you can start your GitLab instance by running the following command:
  sudo gitlab-ctl reconfigure
Step 2 – Configure GitLab CE
GitLab stores configuration information in GitLab.rb file. You will need to edit it and change the URL that points to your domain name.
nano /etc/gitlab/gitlab.rb
Change the following line with your domain name.
external_url 'http://gitlab.linuxbuz.com'
Save and close the file, then reconfigure GitLab to apply the changes.
gitlab-ctl reconfigure
Next, fetch the GitLab root password with the following command.
cat /etc/gitlab/initial_root_password
Output.
#          1. If provided manually (either via `GITLAB_ROOT_PASSWORD` environment variable or via `gitlab_rails['initial_root_password']` setting in `gitlab.rb`, it was provided before database was seeded for the first time (usually, the first reconfigure run).
#          2. Password hasn't been changed manually, either via UI or via command line.
#
#          If the password shown here doesn't work, you must reset the admin password following https://docs.gitlab.com/ee/security/reset_user_password.html#reset-your-root-password.

Password: PrgBSc61QdgKtjyrfZPLVGLcUzCW5svzvIIGX9sNFeo=

# NOTE: This file will be automatically deleted in the first reconfigure run after 24 hours.
Step 3 – Access GitLab CE
Now, open your web browser and access the GitLab web interface using the URL http://gitlab.linuxbuz.com. You will see the GitLab login page.
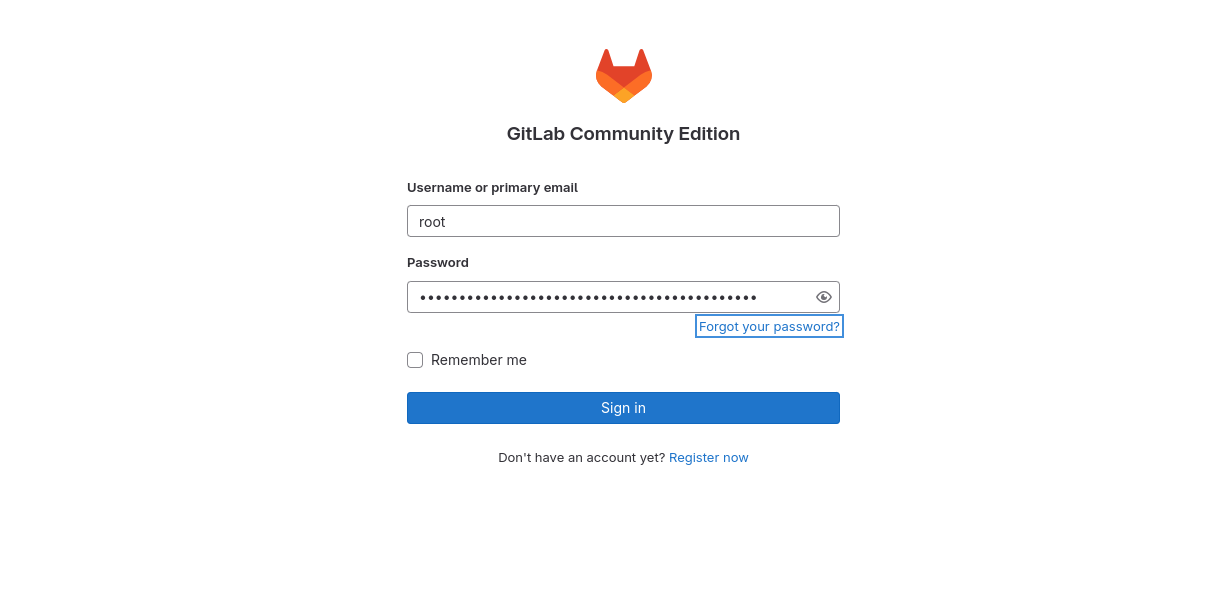
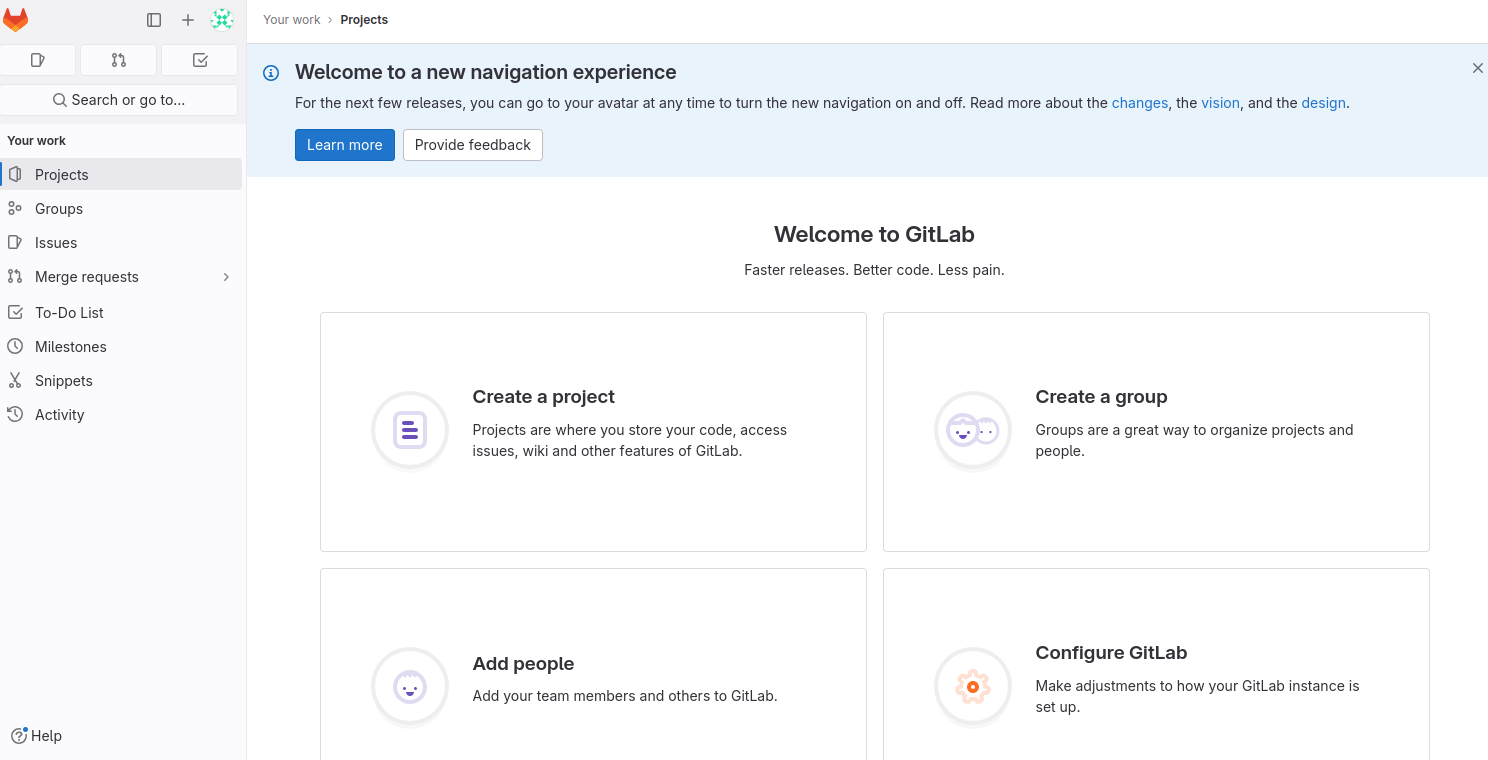
Provide your GitLab username and password and click on the Sign in button. You will see the GitLab dashboard on the following screen.
Step 4 – Enable SSL on GitLab
For security reasons, it is always recommended to secure the GitLab instance with Let’s Encrypt SSL. To do so, edit the GitLab configuration file.
nano /etc/gitlab/gitlab.rb
Change the following lines.
external_url 'https://gitlab.linuxbuz.com'

letsencrypt['enable'] = true
letsencrypt['contact_emails'] = ['[email protected]']
letsencrypt['auto_renew'] = true
letsencrypt['auto_renew_hour'] = 3
letsencrypt['auto_renew_day_of_month'] = "*/7"
Save and close the file, then reconfigure the GitLab to reload the changes.
gitlab-ctl reconfigure
Next, verify the GitLab status using the following command.
gitlab-ctl status
Output.
down: alertmanager: 0s, normally up, want up; run: log: (pid 133174) 4865s
run: crond: (pid 136477) 4453s; run: log: (pid 135800) 4532s
run: gitaly: (pid 133575) 4817s; run: log: (pid 132705) 5036s
run: gitlab-exporter: (pid 133567) 4817s; run: log: (pid 133095) 4882s
run: gitlab-kas: (pid 136429) 4455s; run: log: (pid 132893) 5016s
run: gitlab-workhorse: (pid 133541) 4818s; run: log: (pid 133011) 4902s
run: logrotate: (pid 155175) 1451s; run: log: (pid 132626) 5050s
run: nginx: (pid 136437) 4455s; run: log: (pid 133030) 4896s
run: node-exporter: (pid 133553) 4818s; run: log: (pid 133072) 4888s
run: postgres-exporter: (pid 133846) 4784s; run: log: (pid 133224) 4860s
run: postgresql: (pid 132748) 5028s; run: log: (pid 132763) 5024s
run: prometheus: (pid 133594) 4816s; run: log: (pid 133145) 4870s
run: puma: (pid 136086) 4504s; run: log: (pid 132958) 4912s
run: redis: (pid 132660) 5045s; run: log: (pid 132670) 5042s
run: redis-exporter: (pid 133569) 4817s; run: log: (pid 133120) 4876s
run: registry: (pid 136444) 4454s; run: log: (pid 135880) 4526s
run: sidekiq: (pid 136019) 4510s; run: log: (pid 132977) 4907s
You can now access the GitLab securely using the URL https://gitlab.linuxbuz.com.
Conclusion
In this tutorial, we explained how to install GitLab CE on Ubuntu 24.04. We also showed how to secure GitLab with Let’s Encrypt SSL. You can now create your first DevOps project on GitLab and automate your deployment process via a web-based interface. Try to set up a CI/CD pipeline with GitLab on dedicated server hosting from Atlantic.Net!
* This post is for informational purposes only and does not constitute professional, legal, financial, or technical advice. Each situation is unique and may require guidance from a qualified professional.
Readers should conduct their own due diligence before making any decisions.