Kubernetes Dashboard is a web-based user interface that allows users to manage and monitor Kubernetes clusters. It provides a graphical interface for performing common Kubernetes tasks, such as deploying applications, inspecting resources, and troubleshooting issues. Kubernetes Dashboard makes it easier for users to interact with and control their containerized applications and infrastructure. It is especially useful for users who prefer a graphical interface over command-line tools or who are new to Kubernetes and want an intuitive way to get started.
In this tutorial, we will show you how to install Kubernetes Dashboard using Helm on Ubuntu 22.04.
Prerequisites
- A server running Ubuntu 22.04 with Kubernetes installed
Step 1 – Add Kubernetes Dashboard Repo
Helm is not included by default in the Ubuntu default repo, so you will need to install it using a script.
First, download the Helm installation script.
curl -fsSL -o get_helm.sh https://raw.githubusercontent.com/helm/helm/main/scripts/get-helm-3
Next, make the downloaded script executable.
chmod 700 get_helm.sh
Next, run the script to install Helm.
./get_helm.sh
Next, add the Kubernetes Dashboard repo using Helm.
helm repo add kubernetes-dashboard https://kubernetes.github.io/dashboard/
You can verify the added repo using the following command:
helm repo list
Output:
NAME                	URL
kubernetes-dashboard	https://kubernetes.github.io/dashboard/
Step 2 – Install Kubernetes Dashboard Using Helm
Now you can install Kubernetes Dashboard chart using Helm. You may want to specify a release name and namespace during installation.
helm upgrade --install kubernetes-dashboard kubernetes-dashboard/kubernetes-dashboard --create-namespace --namespace kubernetes-dashboard
Output:
*************************************************************************************************
*** PLEASE BE PATIENT: Kubernetes Dashboard may need a few minutes to get up and become ready ***
*************************************************************************************************

Congratulations! You have just installed Kubernetes Dashboard in your cluster.

To access Dashboard run:
  kubectl -n kubernetes-dashboard port-forward svc/kubernetes-dashboard-kong-proxy 8443:443

NOTE: In case port-forward command does not work, make sure that kong service name is correct.
      Check the services in Kubernetes Dashboard namespace using:
        kubectl -n kubernetes-dashboard get svc

Dashboard will be available at:
  https://localhost:8443
Once Kubernetes Dashboard is installed, you can verify it using the following command:
kubectl get svc -n kubernetes-dashboard
Output:
NAME                                   TYPE        CLUSTER-IP      EXTERNAL-IP   PORT(S)                         AGE
kubernetes-dashboard-web               ClusterIP   10.43.128.204           8000/TCP                        12m
kubernetes-dashboard-kong-manager      NodePort    10.43.163.11            8002:32281/TCP,8445:31992/TCP   12m
kubernetes-dashboard-auth              ClusterIP   10.43.141.160           8000/TCP                        12m
kubernetes-dashboard-metrics-scraper   ClusterIP   10.43.159.40            8000/TCP                        12m
kubernetes-dashboard-api               ClusterIP   10.43.8.225             8000/TCP                        12m
kubernetes-dashboard-kong-proxy        ClusterIP   10.43.208.190           443/TCP                         12m
Step 3 – Generate Token for Kubernetes Dashboard
Now, you will need to generate a token to access Kubernetes Dashboard.
First, create a Kubernetes manifest file to create a service account.
nano k8s-dashboard-account.yaml
Add the following content:
apiVersion: v1
kind: ServiceAccount
metadata:
  name: admin-user
  namespace: kube-system
---
apiVersion: rbac.authorization.k8s.io/v1
kind: ClusterRoleBinding
metadata:
  name: admin-user
roleRef:
  apiGroup: rbac.authorization.k8s.io
  kind: ClusterRole
  name: cluster-admin
subjects:
- kind: ServiceAccount
  name: admin-user
  namespace: kube-system
Next, apply the above configuration to the Kubernetes cluster.
kubectl create -f k8s-dashboard-account.yaml
Next, generate a token using the following command:
kubectl -n kube-system create token admin-user
Output:
eyJhbGciOiJSUzI1NiIsImtpZCI6IkIwbk5FWE0zVXppQV9aVWEyMndzRlNnMllIREpldUdVckVZdzFqUzcwalEifQ.eyJhdWQiOlsiaHR0cHM6Ly9rdWJlcm5ldGVzLmRlZmF1bHQuc3ZjLmNsdXN0ZXIubG9jYWwiLCJrM3MiXSwiZXhwIjoxNzExMTcwMjQwLCJpYXQiOjE3MTExNjY2NDAsImlzcyI6Imh0dHBzOi8va3ViZXJuZXRlcy5kZWZhdWx0LnN2Yy5jbHVzdGVyLmxvY2FsIiwia3ViZXJuZXRlcy5pbyI6eyJuYW1lc3BhY2UiOiJrdWJlLXN5c3RlbSIsInNlcnZpY2VhY2NvdW50Ijp7Im5hbWUiOiJhZG1pbi11c2VyIiwidWlkIjoiNTNhNjdhNjYtNDAyOC00MTFlLWI5YTctMzViZDJkYzUwOTc2In19LCJuYmYiOjE3MTExNjY2NDAsInN1YiI6InN5c3RlbTpzZXJ2aWNlYWNjb3VudDprdWJlLXN5c3RlbTphZG1pbi11c2VyIn0.XrTJC9WhaZrhRuo2buBXy48AnaGxsjHcLNCZpjpcXF5UQagR3GQgCpyArWWuGaw8Wu_-bCzHknsZ1oQ4kDLnwCrtgnG3bg18axuodvydMivw2iETtEZNTRJF989amM8fdO3xSQgNh9O59UjiebUtNNQ45d2Rmzxq1VoVpsL0hx9D0WIg-7iUZ305OKjufIBWx0nW_VBRaBE4kLWj3t7ykJdIE9qE0s12s7XjUnLvA1DWFWC_SoG08q8q4Y0LdThKz8wzVI87DR4KTlTTuSPJEZkI5hcZu02SkKaleNBYnFlabBD1IWXK18uY_5LAIFrjDgkCPUysCbAA_7F87dZ4sg
Step 4 – Access Kubernetes Dashboard
To access Kubernetes Dashboard from the outside network, you will need to expose it using the port forward method. Run the following command to expose Kubernetes Dashboard.
kubectl port-forward -n kubernetes-dashboard service/kubernetes-dashboard-kong-proxy 10443:443 --address 0.0.0.0 &
You will see the following output:
Forwarding from 0.0.0.0:10443 -> 8443
Now, open your web browser and access Kubernetes Dashboard using the URL https://server-ip:10443. You will be asked to enter a token to log in.
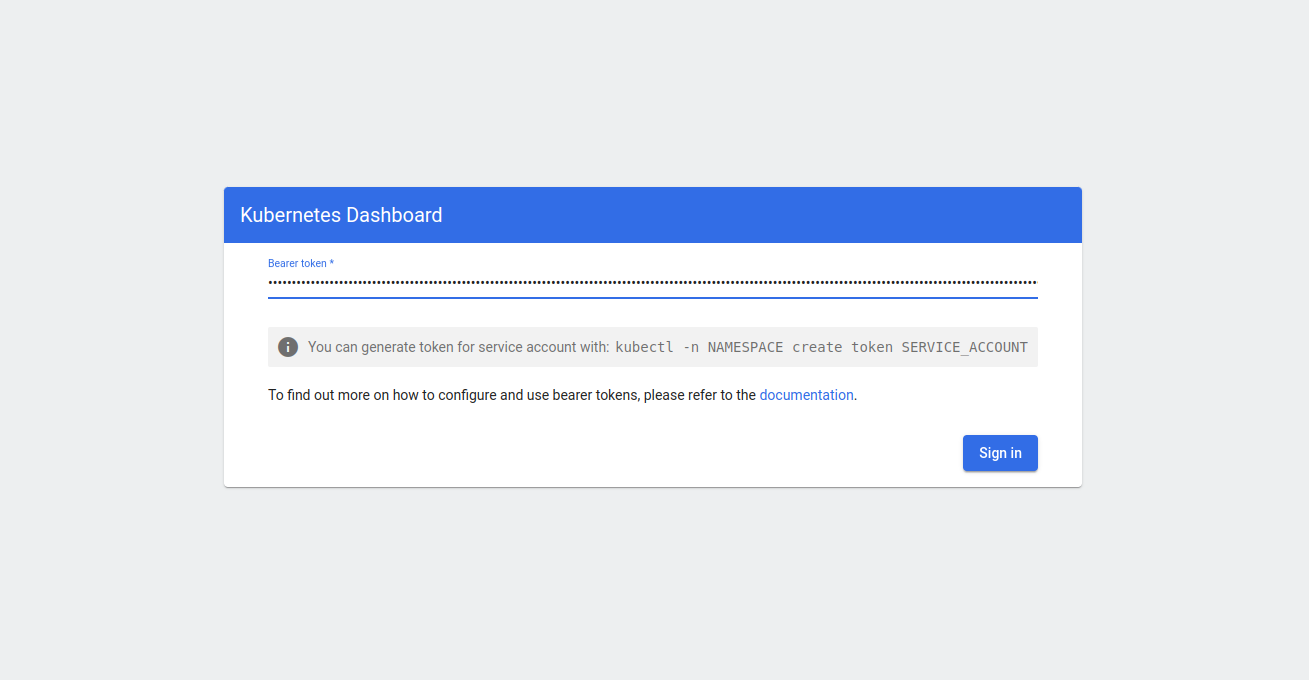
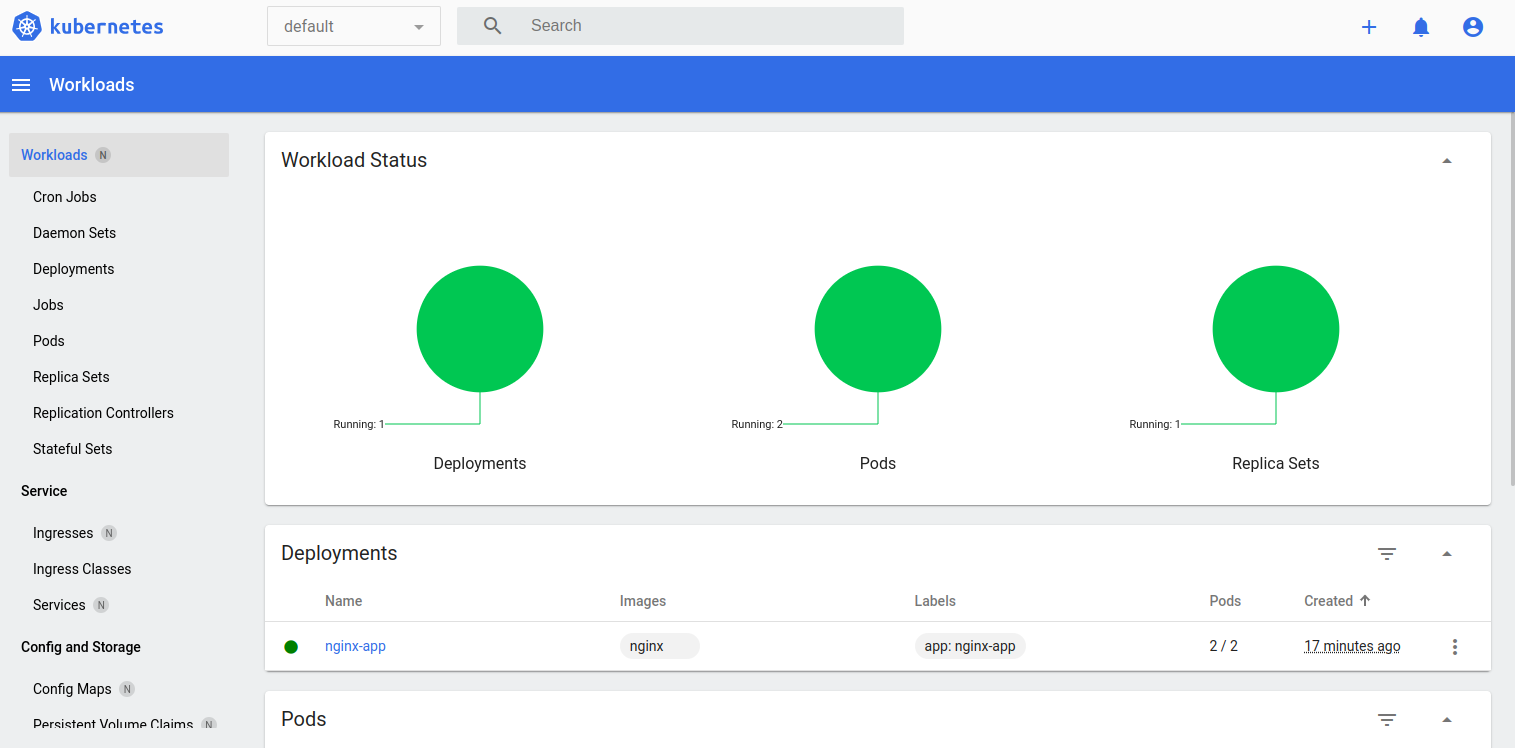
Provide your generated token and click on Sign in. You will see Kubernetes Dashboard on the following screen.
Conclusion
In this guide, you learned how to install Kubernetes Dashboard using Helm on Ubuntu 22.04. You can now manage and monitor Kubernetes pods, services, and logs via Kubernetes Dashboard. You can now start managing your Kubernetes cluster using Kubernetes Dashboard on dedicated server hosting from Atlantic.Net!
* This post is for informational purposes only and does not constitute professional, legal, financial, or technical advice. Each situation is unique and may require guidance from a qualified professional.
Readers should conduct their own due diligence before making any decisions.