Syncthing is a powerful and secure open-source file synchronization tool that synchronizes files across multiple devices and platforms. Whether you need to synchronize files between your computers, servers, or mobile devices, Syncthing offers a decentralized and flexible solution that prioritizes privacy and security. Syncthing lets you create your private file synchronization network, ensuring your data remains controlled and protected from third-party access.
In this guide, we will walk you through the step-by-step process of installing Syncthing on Ubuntu 24.04.
Step 1 – Add Syncthing Repository
By default, the Syncthing package is not included in the Ubuntu central repository, so you will need to add the Syncthing official repo to the APT source list.
First, install the required dependencies:
apt update -y
apt install curl gpg -y
Next, download the Syncthing GPG key:
curl -fsSL https://syncthing.net/release-key.txt | gpg --dearmor -o /etc/apt/trusted.gpg.d/syncthing.gpg
Next, add the Syncthing repository to APT.
echo "deb [signed-by=/usr/share/keyrings/syncthing-archive-keyring.gpg] https://apt.syncthing.net/ syncthing stable" | sudo tee /etc/apt/sources.list.d/syncthing.list
Next, update the repository index.
apt update
Step 2 – Install Syncthing
At this point, the Syncthing repository is ready. You can now install Syncthing using the apt command:
apt install syncthing
Once Syncthing is installed, you can verify the Syncthing installation using the following command:
syncthing --version
You will see the Syncthing version in the following output:
syncthing v1.27.2-ds4 "Gold Grasshopper" (go1.22.2 linux-amd64) debian@debian 2024-11-08 06:50:53 UTC
Step 3 – Manage Syncthing Service
By default Syncthing service is managed by systemd. You can easily start, stop, and disable the Syncthing service via the systemctl command.
To start the Syncthing service, run:
systemctl start [email protected]
To enable the Syncthing service, run:
systemctl enable [email protected]
To check the status of the Syncthing service, run:
systemctl status [email protected]
Output:
● [email protected] - Syncthing - Open Source Continuous File Synchronization for root
     Loaded: loaded (/usr/lib/systemd/system/[email protected]; disabled; preset: enabled)
     Active: active (running) since Wed 2025-05-14 06:44:27 UTC; 38s ago
       Docs: man:syncthing(1)
   Main PID: 5670 (syncthing)
      Tasks: 15 (limit: 4609)
     Memory: 15.2M (peak: 15.7M)
        CPU: 1.520s
     CGroup: /system.slice/system-syncthing.slice/[email protected]
             ├─5670 /usr/bin/syncthing serve --no-browser --no-restart --logflags=0
             └─5677 /usr/bin/syncthing serve --no-browser --no-restart --logflags=0

May 14 06:44:29 ubuntu syncthing[5670]: [VD6A4] INFO: QUIC listener ([::]:22000) starting
May 14 06:44:29 ubuntu syncthing[5670]: [VD6A4] INFO: Loading HTTPS certificate: open /root/.local/state/syncthing/https-cert.pem: no such file or directory
May 14 06:44:29 ubuntu syncthing[5670]: [VD6A4] INFO: Creating new HTTPS certificate
May 14 06:44:29 ubuntu syncthing[5670]: [VD6A4] INFO: GUI and API listening on 127.0.0.1:8384
May 14 06:44:29 ubuntu syncthing[5670]: [VD6A4] INFO: Access the GUI via the following URL: http://127.0.0.1:8384/
May 14 06:44:29 ubuntu syncthing[5670]: [VD6A4] INFO: My name is "ubuntu"
May 14 06:44:29 ubuntu syncthing[5670]: [VD6A4] WARNING: Syncthing should not run as a privileged or system user. Please consider using a normal user account.
May 14 06:44:29 ubuntu syncthing[5670]: [VD6A4] INFO: Completed initial scan of sendreceive folder "Default Folder" (default)
May 14 06:44:42 ubuntu syncthing[5670]: [VD6A4] INFO: Joined relay relay://172.93.167.234:22067
May 14 06:44:49 ubuntu syncthing[5670]: [VD6A4] INFO: Detected 0 NAT services
Step 4 – Configure Syncthing
By default, Syncthing listens on localhost. To access Syncthing from the outside world, you will need to configure It to listen on your server IP.
Edit the Syncthing configuration file.
nano /root/.local/state/syncthing/config.xml
Find the following line:
<address>127.0.0.1:8384</address>
Replace it with the following line:
<address>your-server-ip:8384</address>
Save and close the file, then restart the Syncthing service:
systemctl restart [email protected]
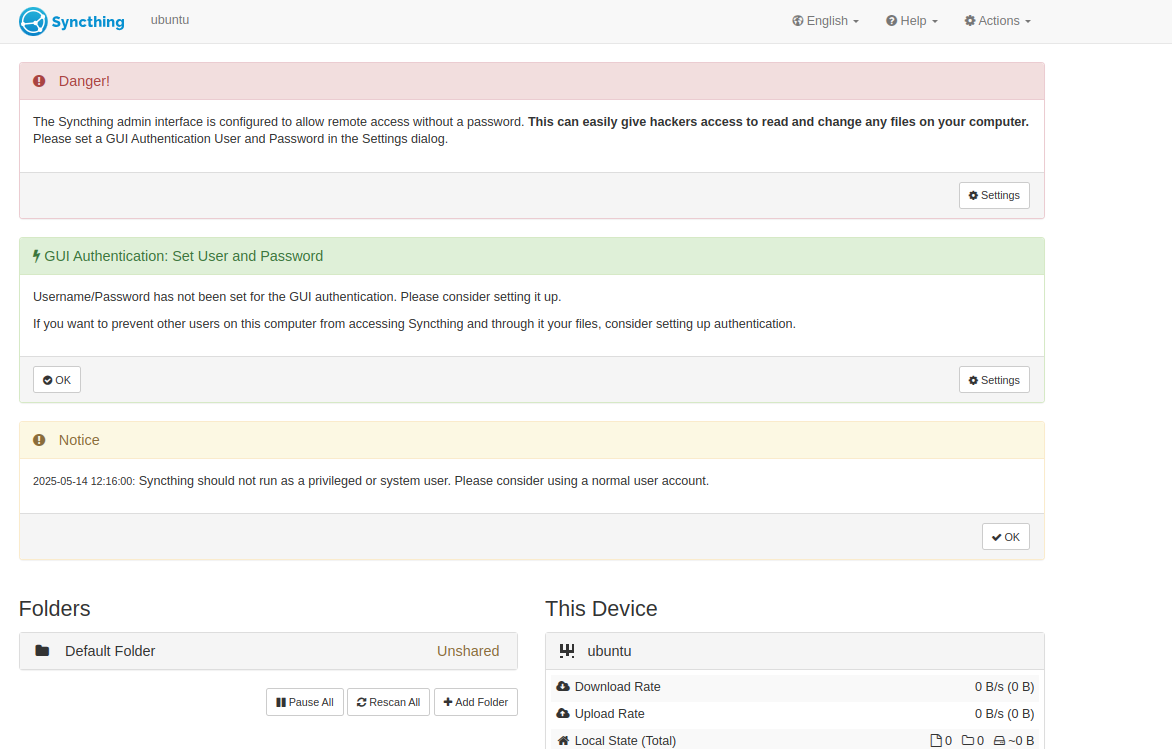
Step 5 – Access Syncthing Web UI
Now, open your web browser and access the Syncthing web interface using the URL http://your-server-ip:8384. You will see the Syncthing dashboard on the following screen.
You can now follow the same steps to install Syncthing on another server and share files and folders between both servers.
Conclusion
In this guide, we’ve covered the steps to install Syncthing, configure its settings, and access its web interface for managing file synchronization across your devices. With Syncthing, you can synchronize files seamlessly, collaborate with others, and access your data from anywhere without relying on third-party cloud services or compromising the security of your files. You can try deploying Syncthing on dedicated server hosting from Atlantic.Net!
* This post is for informational purposes only and does not constitute professional, legal, financial, or technical advice. Each situation is unique and may require guidance from a qualified professional.
Readers should conduct their own due diligence before making any decisions.