Kubernetes is a free and open-source platform that allows you to deploy, scale, and manage containerized applications automatically. It supports various container runtimes such as Docker, containerd, CRI-O, and any implementation of the Kubernetes CRI (Container Runtime Interface). Kubernetes automates several container-related tasks, including deployment, rollouts, service discovery, storage provisioning, load balancing, autoscaling, and more.
This post will show you how to install Kubernetes on Arch Linux.
Step 1 – Configure Repository
By default, the default repository is outdated in Arch Linux, so you will need to modify the default mirror list. You can do it by editing the mirrorlist configuration file:
nano /etc/pacman.d/mirrorlist
Remove all lines and add the following lines:
## Score: 0.7, United States
Server = http://mirror.us.leaseweb.net/archlinux/$repo/os/$arch
## Score: 0.8, United States
Server = http://lug.mtu.edu/archlinux/$repo/os/$arch
Server = http://mirror.nl.leaseweb.net/archlinux/$repo/os/$arch
## Score: 0.9, United Kingdom
Server = http://mirror.bytemark.co.uk/archlinux/$repo/os/$arch
## Score: 1.5, United Kingdom
Server = http://mirrors.manchester.m247.com/arch-linux/$repo/os/$arch
Server = http://archlinux.dcc.fc.up.pt/$repo/os/$arch
## Score: 6.6, United States
Server = http://mirror.cs.pitt.edu/archlinux/$repo/os/$arch
## Score: 6.7, United States
Server = http://mirrors.acm.wpi.edu/archlinux/$repo/os/$arch
## Score: 6.8, United States
Server = http://ftp.osuosl.org/pub/archlinux/$repo/os/$arch
## Score: 7.1, India
Server = http://mirror.cse.iitk.ac.in/archlinux/$repo/os/$arch
## Score: 10.1, United States
Server = http://mirrors.xmission.com/archlinux/$repo/os/$arch
Save and close the file, then update all the package indexes with the following command:
pacman -Syu
Step 2 – Install Docker Engine
Kubernetes requires Docker Engine to be installed on your server. If not installed, you can install it with the following command.
pacman -S docker
Once Docker is installed, enable the Docker service using the following command.
systemctl enable docker
Next, restart your system to apply the changes.
reboot
Step 3 – Install Minikube
Minikube provides an easier way to deploy a Kubernetes cluster for local development. The Minikube package is available in the Arch Linux default repository by default. You can install it with the following command.
pacman -S minikube
After the successful installation, start Minikube with the following command.
minikube start --force
This command will set up a local Kubernetes cluster on your server.
😄  minikube v1.28.0 on Arch  (kvm/amd64)
❗  minikube skips various validations when --force is supplied; this may lead to unexpected behavior
✨  Automatically selected the docker driver. Other choices: ssh, none
🛑  The "docker" driver should not be used with root privileges. If you wish to continue as root, use --force.
💡  If you are running minikube within a VM, consider using --driver=none:
📘    https://minikube.sigs.k8s.io/docs/reference/drivers/none/
📌  Using Docker driver with root privileges
👍  Starting control plane node minikube in cluster minikube
🚜  Pulling base image ...
💾  Downloading Kubernetes v1.25.3 preload ...
    > preloaded-images-k8s-v18-v1...:  385.44 MiB / 385.44 MiB  100.00% 40.76 M
    > gcr.io/k8s-minikube/kicbase:  386.27 MiB / 386.27 MiB  100.00% 26.76 MiB
    > gcr.io/k8s-minikube/kicbase:  0 B [________________________] ?% ? p/s 10s
🔥  Creating docker container (CPUs=2, Memory=2200MB) ...
🐳  Preparing Kubernetes v1.25.3 on Docker 20.10.20 ...
    ▪ Generating certificates and keys ...
    ▪ Booting up control plane ...
    ▪ Configuring RBAC rules ...
🔎  Verifying Kubernetes components...
    ▪ Using image gcr.io/k8s-minikube/storage-provisioner:v5
🌟  Enabled addons: default-storageclass, storage-provisioner
💡  kubectl not found. If you need it, try: 'minikube kubectl -- get pods -A'
🏄  Done! kubectl is now configured to use "minikube" cluster and "default" namespace by default
Step 4 – Verify Kubernetes Cluster
You can now verify the Kubernetes cluster using the following command.
minikube kubectl -- get pods -A
You should get the following output.
    > kubectl.sha256:  64 B / 64 B [-------------------------] 100.00% ? p/s 0s
    > kubectl:  42.93 MiB / 42.93 MiB [------------] 100.00% 45.96 MiB p/s 1.1s
NAMESPACE     NAME                               READY   STATUS    RESTARTS      AGE
kube-system   coredns-565d847f94-2dq5q           1/1     Running   0             54s
kube-system   etcd-minikube                      1/1     Running   0             66s
kube-system   kube-apiserver-minikube            1/1     Running   0             67s
kube-system   kube-controller-manager-minikube   1/1     Running   0             66s
kube-system   kube-proxy-g7w2q                   1/1     Running   0             54s
kube-system   kube-scheduler-minikube            1/1     Running   0             67s
kube-system   storage-provisioner                1/1     Running   1 (23s ago)   65s
To get information about nodes, use the following command.
minikube kubectl -- get nodes -A
You will get the following output.
NAME       STATUS   ROLES           AGE    VERSION
minikube   Ready    control-plane   109s   v1.25.3
Step 5 – Access the Minikube Dashboard
By default, the Minikube dashboard is disabled, so you must enable it first.
Run the following command to enable the Minikube dashboard.
minikube dashboard
You can now retrieve the Minikube URL with the following command.
minikube dashboard --url
You should see your Minikube URL in the following output.
🤔  Verifying dashboard health ...
🚀  Launching proxy ...
🤔  Verifying proxy health ...
http://127.0.0.1:38999/api/v1/namespaces/kubernetes-dashboard/services/http:kubernetes-dashboard:/proxy/
Minikube dashboard is now enabled and listens on port 38999 on localhost. You can access the Minikube dashboard only from the localhost. You must use the SSH port forwarding method to access the Minikube dashboard from the remote system.
Log in to your Linux desktop system and forward your SSH port using the following command.
ssh -L 38999:127.0.0.1:38999 -fN root@your-server-ip
You will be asked to provide your server’s root password to enable SSH port forwarding.
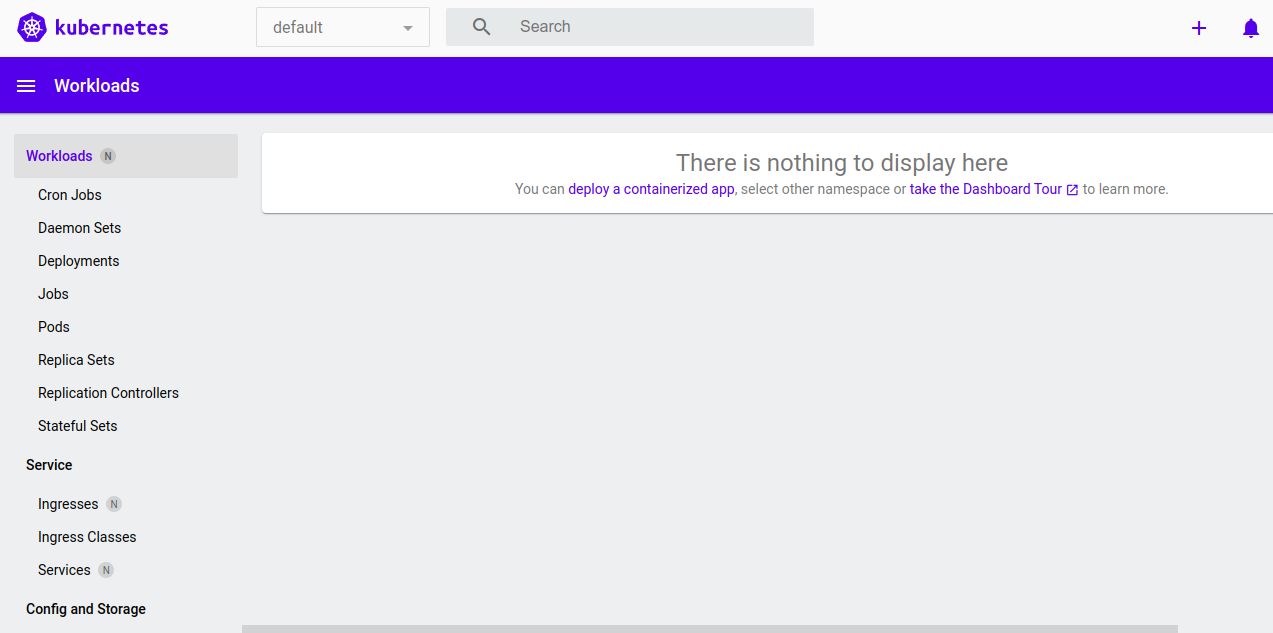
You can now open your web browser and access the Minikube dashboard using the URL http://127.0.0.1:38999/api/v1/namespaces/kubernetes-dashboard/services/http:kubernetes-dashboard:/proxy/. You should see the Minikube dashboard on the following screen.
Conclusion
This tutorial explained how to install the Kubernetes cluster with Minikube on Arch Linux 8. You can follow this tutorial to deploy a Kubernetes cluster for local development. You can also try to deploy Kubernetes on dedicated server hosting from Atlantic.Net!
