Artificial Intelligence (AI) has revolutionized image generation, enabling the creation of high-quality, photorealistic images from text prompts. One of the most advanced models in this domain is Stable Cascade, developed by Stability AI. Built on the Würstchen architecture, Stable Cascade employs a three-stage (A, B, C) process to generate efficient and high-quality images.
This guide will walk you through setting up and running the Stable Cascade model on an Atlantic.Net Cloud GPU Server running Ubuntu.
What Is Stable Cascade?
Stable Cascade is a state-of-the-art text-to-image generation model that leverages a three-stage architecture for improved efficiency and image quality. The model’s stages are as follows:
- Stage A: The Encoder Network compresses an input image into a latent code, reducing the data size by 42x. This compressed data is stored in a low-dimensional latent space and passed to Stage B.
- Stage B: The Decoder Network expands the latent code, adding details and filling in missing information before forwarding it to the Latent Generator.
- Stage C: The Latent Generator combines the compressed latent code from Stage B with a text prompt to iteratively refine and generate a high-resolution image aligned with the input prompt.
Prerequisites
Before starting, ensure you have the following:
- An Ubuntu 24.04 Cloud GPU Server with 20 GB GPU memory.
- CUDA Toolkit 12.x and cuDNN 8.x installed
- Git Installed:
sudo apt install git - Root or sudo privileges.
Step 1: Setting Up the Environment
To get started, you need to set up a development environment on your Ubuntu GPU server. Follow these steps:
1. First, update your system and install the necessary dependencies:
apt update
apt install python3 python3-pip python3-venv
2. Create a virtual environment to isolate your project dependencies:
python3 -m venv stablecascade-env
source stablecascade-env/bin/activate
3. Install Jupyter Notebook to create an interactive environment for running the model:
pip install jupyterStep 2: Installing the Stable Cascade Model
1. Clone the official Stable Cascade repository:
git clone https://github.com/Stability-AI/StableCascade.git
cd StableCascade
2. Remove an existing requirements.txt file. This is to ensure a clean install.
rm -rf requirements.txt2. Create a new requirements.txt file.
nano requirements.txtAdd the following dependencies:
--find-links https://download.pytorch.org/whl/torch_stable.html
accelerate
torch
torchvision
transformers
numpy
kornia
insightface
opencv-python
tqdm
matplotlib
webdataset
wandb
munch
onnxruntime
einops
onnx2torch
warmup-scheduler @ git+https://github.com/ildoonet/pytorch-gradual-warmup-lr.git
torchtools @ git+https://github.com/pabloppp/pytorch-tools
3. Install the dependencies:
pip install -r requirements.txt4. Navigate to the models directory and download the required model weights:
cd models
bash download_models.sh essential big-big bfloat16
5. Go back to your project directory.
cd ..Step 3: Generating Images with Stable Cascade
Once the environment is set up, you can start generating images using the Stable Cascade model. Below is a step-by-step guide to implementing the model in a Jupyter Notebook.
1. Run the Jupyter Notebook server, replacing your-server-ip with the actual public IP address of your Ubuntu server. Ensure port 8888 is open in your server’s firewall:
jupyter notebook --no-browser --port=8888 --ip=your-server-ip --allow-rootOutput.
    To access the server, open this file in a browser:
        file:///root/.local/share/jupyter/runtime/jpserver-7437-open.html
    Or copy and paste one of these URLs:
        http://your-server-ip:8888/tree?token=6a8386b686c4131d1da9aa9b95750fdffa11e38e1ce23958
        http://127.0.0.1:8888/tree?token=6a8386b686c4131d1da9aa9b95750fdffa11e38e1ce23958
2. Access the notebook using the provided URL, such as: http://your-server-ip:8888/tree?token=6a8386b686c4131d1da9aa9b95750fdffa11e38e1ce23958
3. Click on File and create a new notebook.
4. Add the below code in the notebook shell to import the necessary Python packages:
import os
import yaml
import torch
import torchvision
from tqdm import tqdm
from PIL import Image

os.chdir('/root/StableCascade/')
from inference.utils import *
from core.utils import load_or_fail
from train import WurstCoreC, WurstCoreB
This code block imports the necessary modules for file operations (os), configuration parsing (yaml), PyTorch functionalities (torch, torchvision), image processing (PIL), progress tracking (tqdm), and model-specific utility functions and classes (inference.utils, core.utils, train). The os.chdir() function changes the working directory to the Stable Cascade project folder.
5. Check if the GPU is available:
device = torch.device("cuda:0" if torch.cuda.is_available() else "cpu")
print(device)
This code checks if a GPU is available and sets the device accordingly. If a GPU is available, it will use cuda:0; otherwise, it defaults to the CPU.
6. Load the configuration files for Stage C and Stage B:
# Stage C
config_file = 'configs/inference/stage_c_3b.yaml'
with open(config_file, "r", encoding="utf-8") as file:
    loaded_config = yaml.safe_load(file)
core = WurstCoreC(config_dict=loaded_config, device=device, training=False)
This step loads the YAML configuration file for Stage C, which contains model settings and parameters. The WurstCoreC class initializes the Stage C model.
7. Load the configuration file for Stage B:
# Stage B
config_file_b = 'configs/inference/stage_b_3b.yaml'
with open(config_file_b, "r", encoding="utf-8") as file:
    config_file_b = yaml.safe_load(file)
core_b = WurstCoreB(config_dict=config_file_b, device=device, training=False)
Similar to Stage C, this step loads the configuration file for Stage B and initializes the model using the WurstCoreB class.
8. Prepare the Stage C model for inference:
extras = core.setup_extras_pre()
models = core.setup_models(extras)
models.generator.eval().requires_grad_(False)
print("STAGE C READY")
This code sets up the Stage C model by initializing the generator, discriminator, and tokenizer. The eval() method sets the model to evaluation mode, and requires_grad_(False) disables gradient computation to save resources.
9. Prepare the Stage B model for inference:
extras_b = core_b.setup_extras_pre()
models_b = core_b.setup_models(extras_b, skip_clip=True)
models_b = WurstCoreB.Models(
   **{**models_b.to_dict(), 'tokenizer': models.tokenizer, 'text_model': models.text_model}
)
models_b.generator.bfloat16().eval().requires_grad_(False)
print("STAGE B READY")
This step prepares the Stage B model, similar to Stage C. The bfloat16() method converts the model parameters to 16-bit floating-point precision for faster computation.
10. Set the batch size and text prompt for image generation:
batch_size = 4
caption = "Anthropomorphic cat dressed as a pilot"
The batch_size determines how many images are generated in parallel. The caption variable contains the text prompt that describes the desired image.
11. Set the height and width of the generated image:
height, width = 1024, 1024
stage_c_latent_shape, stage_b_latent_shape = calculate_latent_sizes(height, width, batch_size=batch_size)
This step defines the resolution of the generated image and calculates the latent sizes for Stage C and Stage B.
12. Configure the sampling parameters for Stage C and Stage B:
# Stage C Parameters
extras.sampling_configs['cfg'] = 4
extras.sampling_configs['shift'] = 2
extras.sampling_configs['timesteps'] = 20
extras.sampling_configs['t_start'] = 1.0

# Stage B Parameters
extras_b.sampling_configs['cfg'] = 1.1
extras_b.sampling_configs['shift'] = 1
extras_b.sampling_configs['timesteps'] = 10
extras_b.sampling_configs['t_start'] = 1.0
These parameters control the sampling process during image generation, such as the number of timesteps and the guidance scale.
13. Prepare conditions and unconditional inputs for both stages:
batch = {'captions':  * batch_size}
conditions = core.get_conditions(batch, models, extras, is_eval=True, is_unconditional=False, eval_image_embeds=False)
unconditions = core.get_conditions(batch, models, extras, is_eval=True, is_unconditional=True, eval_image_embeds=False)
conditions_b = core_b.get_conditions(batch, models_b, extras_b, is_eval=True, is_unconditional=False)
unconditions_b = core_b.get_conditions(batch, models_b, extras_b, is_eval=True, is_unconditional=True)
This step prepares the conditions required for generating images based on the input text prompt.
14. Disable parallelism to avoid conflicts during image generation:
os.environ["TOKENIZERS_PARALLELISM"] = "false"This step ensures that the tokenizer runs sequentially, preventing potential issues with parallel processing.
15. . Run the image generation process, with tqdm providing a progress bar to track the sampling steps:
with torch.no_grad(), torch.cuda.amp.autocast(dtype=torch.bfloat16):
    sampling_c = extras.gdf.sample(
        models.generator, conditions, stage_c_latent_shape,
        unconditions, device=device, **extras.sampling_configs,
    )
    for (sampled_c, _, _) in tqdm(sampling_c, total=extras.sampling_configs['timesteps']):
        sampled_c = sampled_c
    conditions_b['effnet'] = sampled_c
    unconditions_b['effnet'] = torch.zeros_like(sampled_c)
    sampling_b = extras_b.gdf.sample(
        models_b.generator, conditions_b, stage_b_latent_shape,
        unconditions_b, device=device, **extras_b.sampling_configs
    )
    for (sampled_b, _, _) in tqdm(sampling_b, total=extras_b.sampling_configs['timesteps']):
        sampled_b = sampled_b
    sampled = models_b.stage_a.decode(sampled_b).float()
This code generates the image in two stages. Stage C creates a latent representation, and Stage B decodes it into a high-resolution image. The torch.cuda.amp.autocast enables mixed-precision computation for faster processing.
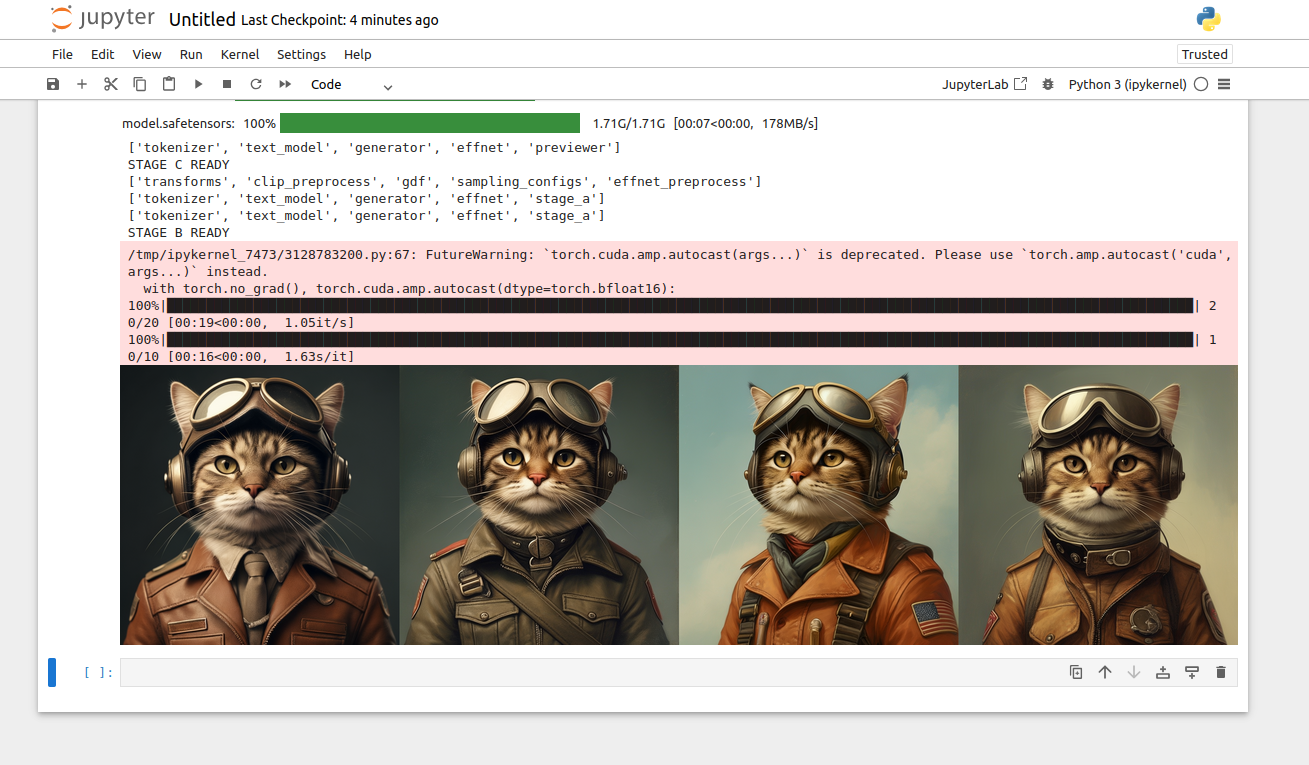
16. View the generated image:
show_images(sampled)This step displays the final image generated based on the input text prompt.
Conclusion
By following this guide, you have successfully set up and run the Stable Cascade model on an Atlantic.Net Cloud GPU Server to generate AI images. The model’s three-stage architecture ensures high-quality results, and its flexibility allows for various extensions and fine-tuning options.
* This post is for informational purposes only and does not constitute professional, legal, financial, or technical advice. Each situation is unique and may require guidance from a qualified professional.
Readers should conduct their own due diligence before making any decisions.