Table of Contents
Verified and Tested 04/21/2015
Introduction
This tutorial will take you through adding another IP to your FreeBSD 10.1 Atlantic.Net Cloud server. This tutorial will cover public and private IPs available in the Cloud Portal.
Add an Additional IP to FreeBSD 10
To add an IP to FreeBSD, you need to first open /etc/rc.conf with an editor. In our case, we use vi here.
vi /etc/rc.conf
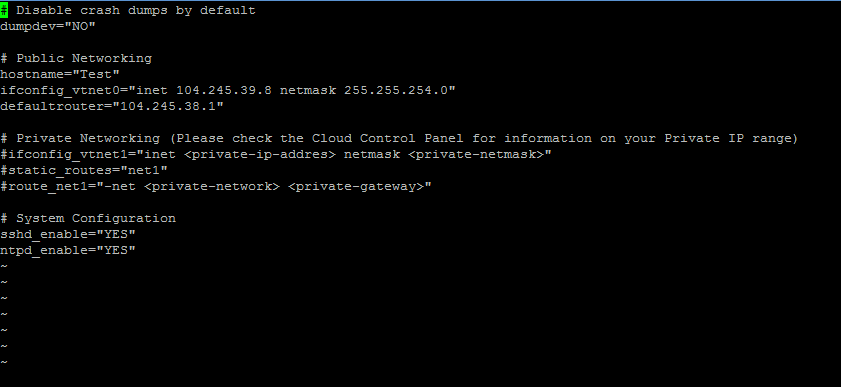
Once in, you should receive a screen like below.

Sample rc.conf
For public IPs:
For adding a public IP, you will want to add an alias to the ifconfig_vtnet0 interface. To do this, we add a new line that begins with ifconfig_vtnet0_alias1 under ifconfig_vtnet0 and add your additional IP information. The line should look like this:
ifconfig_vtnet0_alias1="inet 209.208.108.170 netmask 255.255.252.0"
Where 209.208.108.170 is our additional IP.
If you are adding more than one IP, you need to increment the alias segment (so alias2, alias3, and so forth.)
For private IPs:
For adding a private IP, you will want to notice the spot that states #ifconfig_vtnet1=”inet <private-ip-addres> netmask <private-netmask>”. You will first want to uncomment the line by removing the #. Once done, you will want to remove <private-ip-addres> and insert the private IP address you will be using. You will want to do the same thing with <private-netmask> and insert your netmask. The line should end up looking like this:
ifconfig_vtnet1="inet 10.0.208.2 netmask 255.255.255.0"
Where our private IP is 10.0.208.2.
To add more than one private IP, you will want to follow the alias format in the public IP section above. You’d want to start a new line that begins with ifconfig_vtnet1_alias1 and increment the alias as you need to.
Once you have made your changes, you need to save the file and restart networking on the server. To do this run:
ifconfig_vtnet1="inet 10.0.208.2 netmask 255.255.255.0"
The changes and routing will occur immediately, and you can begin using your new IP address(es).
Learn more about our VPS hosting services and VPS hosting price.