Table of Contents
Introduction
FTP (file transfer protocol) is a popular way to transfer files between your computer and a remote computer.
In this article, we will install and configure vsftpd to use SSL certificates on an Ubuntu 20.04.
Configuring SSL with VSFTPD in Ubuntu
First, we will make the directory where the SSL certificate keys will be stored.
mkdir /etc/ssl/certificates
Next, we will create the 2048 encryption key that will last for 365 days.
openssl req -x509 -nodes -days 365 -newkey rsa:2048 -keyout /etc/ssl/certificates/vsftpd.pem -out /etc/ssl/certificates/vsftpd.pem
After creating the key, we will need to change some parameters in the default vsftpd configuration file. I will be using nano command again for the text editor.
nano /etc/vsftpd.conf
You will be editing the path for the rsa_cert_file and rsa_private_key and adding some others to the bottom of this file. The file should look like this at the bottom afterward:
rsa_cert_file=/etc/ssl/certificates/vsftpd.pem
rsa_private_key_file=/etc/ssl/certificates/vsftpd.pem
ssl_enable=YES
allow_anon_ssl=NO
force_local_data_ssl=YES
force_local_logins_ssl=YES
ssl_tlsv1=YES ssl_sslv2=NO
ssl_sslv3=NO
require_ssl_reuse=NO
ssl_ciphers=HIGH
Save and close the file. Restart vsftpd with the command below:
systemctl restart vsftpd
Now we can connect to server using SSL/TLS encryption with Filezilla.
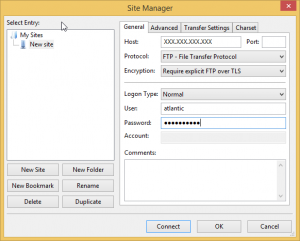
Open Filezilla, Go to File>Site Manager. Click on New Site. Make sure to choose “Require explicit FTP over TLS” for the Encryption type.

Filezilla Site manager
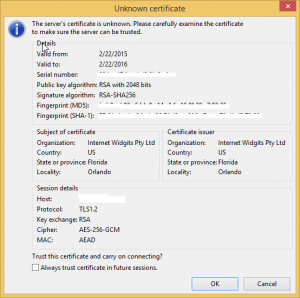
Once you click on connect, you will be prompted with the window below to accept the unknown certificate.

Certificate Warning
Now you are connected to your server with SSL/TLS encryption!