Table of Contents
Verified and Tested 03/31/2015
Introduction
In this how-to, we will walk you through Cloning/Exporting a VM in Windows Server 2012. The Windows Hyper-V term for cloning is called export. The Export feature in Hyper-V is the ability to make and export an exact image of a virtual machine and import it on another host. This process can be done while the server is active, as it captures whatever the server has up to the point of the export.
Prerequisites
– A Server with Windows Server 2012
– A Virtual Machine that you want to be Cloned or Replicated
Procedure

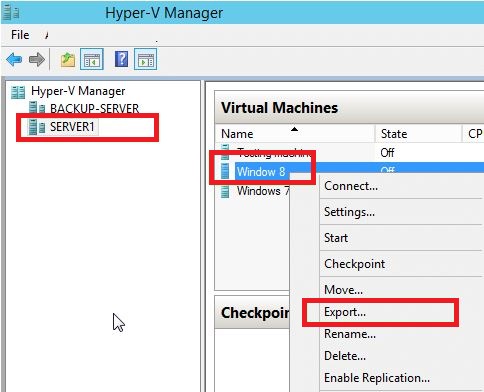
Open your Hyper-V server from Hyper-V Manager/Right-click on your virtual machine and select the Export option.
Select the directory location where you want to export your virtual machine, then click Export.

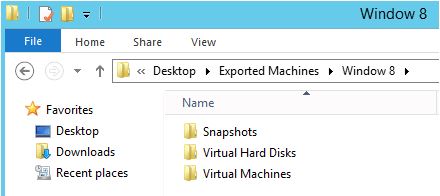
This is the output that you will see after the Export. Confirm Snapshots, Virtual Disk, and Virtual Machine.
After the export is completed, you will see all export files in the folder.
Congratulations! You have just cloned/Exported a VM in Windows Server 2012. Thank you for following along in this How-To, and feel free to check back with us for any new updates and related posts such as How to Import a VM Export on Windows Server 2012. Atlantic.Net has various hosting solutions, including Windows cloud servers, managed cloud servers, and one-click install applications like WordPress Cloud Hosting.
Atlantic.Net
Atlantic.Net offers VPS hosting and managed server hosting services that include a layer of business-essential managed services to your hosting packages. Contact us today for more information.
Learn more about our VPS hosting services and VPS hosting price.
