Verified and Tested 03/10/21
Introduction
Quick installation of GlusterFS on Centos 7.x and 8.x. GlusterFS clusters together storage building blocks over Infiniband RDMA or TCP/IP interconnect, aggregating disk and memory resources and managing data in a single global namespace.
Prerequisites
You’ll need a separate hard disk(s) or virtual disk(s) to use as glusterfs storage mount point(s).
Installing and Configuring GlusterFS on CentOS 7
Install XFS file system
yum install xfsprogs -y
Install and Enable GlusterFS official repository
yum -y install centos-release-gluster40
sed -i -e "s/enabled=1/enabled=0/g" /etc/yum.repos.d/CentOS-Gluster-4.1.repo
Install GlusterFS via YUM
yum --enablerepo=centos-gluster41 -y install glusterfs-server
Partition, format and mount your GlusterFS Volume. In this case our “extra harddisk/virtual disk” is /dev/sdb/. NOTE: I will not be going into detail about how to partition your harddisk, as it is out of the scope of this article. We will be using the FDISK utility to partition /dev/sdb. Also note that you may choose your partitioning scheme as you please. For the sake of simplicity, we’ll be creating a single large partition /deb/sdb1
fdisk /dev/sdb

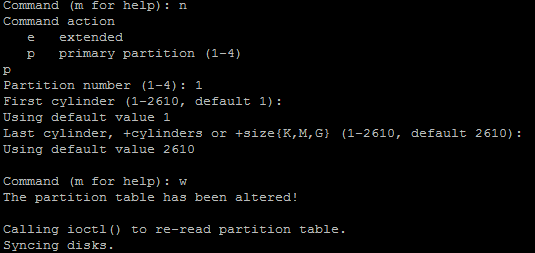
Sample Fdisk Operation
Create a new Primary or extended partition, write it to the disk and exit the FDISK utility.
Proceed to format the disk in XFS.
mkfs.xfs /dev/sdb1 -f
Add your new disk to /etc/fstab so that the disk is mounted at boot time
echo "/dev/sdb1 /export/brick1 xfs defaults 1 2" >> /etc/fstab
mount -a && mount
Start the GlusterFS daemon and make sure it starts upon boot time.
systemctl start glusterd
systemctl enable glusterd
Now, verify the GlusterFS version with the following command:
gluster --version
Output:
glusterfs 4.1.9
Repository revision: git://git.gluster.org/glusterfs.git
Copyright (c) 2006-2016 Red Hat, Inc. <https://www.gluster.org/>
GlusterFS comes with ABSOLUTELY NO WARRANTY.
It is licensed to you under your choice of the GNU Lesser
General Public License, version 3 or any later version (LGPLv3
or later), or the GNU General Public License, version 2 (GPLv2),
in all cases as published by the Free Software Foundation.
Installing and Configuring GlusterFS on CentOS 8
Install XFS file system
dnf install xfsprogs -y
Install and Enable GlusterFS official repository
dnf -y install centos-release-gluster8
sed -i -e "s/enabled=1/enabled=0/g" /etc/yum.repos.d/CentOS-Gluster-8.repo
Install GlusterFS via DNF
dnf --enablerepo=centos-gluster8,PowerTools -y install glusterfs-server
Partition, format and mount your GlusterFS Volume. In this case our “extra harddisk/virtual disk” is /dev/sdb/. NOTE: I will not be going into detail about how to partition your harddisk, as it is out of the scope of this article. We will be using the FDISK utility to partition /dev/sdb. Also note that you may choose your partitioning scheme as you please. For the sake of simplicity, we’ll be creating a single large partition /deb/sdb1
fdisk /dev/sdb

Sample Fdisk Operation
Create a new Primary or extended partition, write it to the disk and exit the FDISK utility.
Proceed to format the disk in XFS.
mkfs.xfs /dev/sdb1 –f
Add your new disk to /etc/fstab so that the disk is mounted at boot time
echo "/dev/sdb1 /export/brick1 xfs defaults 1 2" >> /etc/fstab
mount -a && mount
Start the GlusterFS daemon and make sure it starts upon boot time.
systemctl start glusterd
systemctl enable glusterd
Now, verify the GlusterFS version with the following command:
gluster --version
Output:
glusterfs 8.3
Repository revision: git://git.gluster.org/glusterfs.git
Copyright (c) 2006-2016 Red Hat, Inc. <https://www.gluster.org/>
GlusterFS comes with ABSOLUTELY NO WARRANTY.
It is licensed to you under your choice of the GNU Lesser
General Public License, version 3 or any later version (LGPLv3
or later), or the GNU General Public License, version 2 (GPLv2),
in all cases as published by the Free Software Foundation.
Congratulations you have installed and configured GlusterFS on CentOS 7 and CentOS 8. We hope this article assisted you with the process. Thank you for following this How-To. Check back for updates and more interesting Centos how-to’s or learn more about our reliable VPS hosting solutions.