Verified and Tested 06/13/21
Introduction
In this How-To, we will walk you through the install and configuration of Drupal with Apache. Drupal is a free content management system that will facilitate the way your content is organized and managed. It has a user-friendly interface that makes customizing your content easy and simple with little effort.
Prerequisites
- A cloud server with Ubuntu 20.04 and Apache already installed.
- You will also need to have a Server with LAMP(Linux, Apache, MySQL, PHP) configured. See our “How To Install LAMP on Ubuntu 20.04“.
Install PHP Extensions
First, you will need to install some required PHP extensions to your server. You can install all of them with the following command:
apt-get install php7.4-gd php7.4-common php7.4-mysql php7.4-apcu php7.4-gmp php7.4-curl php7.4-intl php7.4-mbstring php7.4-xmlrpc php7.4-gd php7.4-xml php7.4-cli php7.4-zip -y
Once all the packages are installed, edit the php.ini file and change some default settings.
nano /etc/php/7.4/apache2/php.ini
Change the following lines:
date.timezone = Asia/Kolkata
memory_limit = 256M
upload_max_filesize = 64M
max_execution_time = 300
cgi.fix_pathinfo = 0
Save and close the file when you are finished.
Create Drupal Database
Next, you will need to create a user and database for Drupal.
First, connect to the MySQL shell with the following command:
mysql
Once you are connected, create a database and user with the following command:
create database drupaldb;
create user drupaluser@localhost identified by 'password';
Next, grant all the privileges to drupaldb with the following command:
grant all privileges on drupaldb.* to drupaluser@localhost;
Next, flush the privileges and exit from the MySQL with the following command:
flush privileges;
exit;
Download Drupal
Next, change the directory to Apache default root directory and download the latest version of Drupal with the following command:
cd /var/www/html
wget -q https://www.drupal.org/download-latest/tar.gz -O drupal-latest.tar.gz
Once the download is completed, extract the downloaded file with the following command:
tar -xf drupal-latest.tar.gz
Next, rename the extracted directory to drupal9:
mv drupal-9.1.10 drupal9
Next, set proper ownership to the drupal9 directory:
chown -R www-data:www-data /var/www/html/drupal9
Configure Apache
Next, you will need to create an Apache virtual host configuration file for Drupal. You can create it with the following command:
nano /etc/apache2/sites-available/drupal.conf
Add the following lines:
<VirtualHost *:80>
     ServerName drupal9.example.com
     ServerAdmin [email protected]
     DocumentRoot /var/www/html/drupal9/

     CustomLog ${APACHE_LOG_DIR}/access.log combined
     ErrorLog ${APACHE_LOG_DIR}/error.log

      <Directory /var/www/html/drupal9>
            Options Indexes FollowSymLinks
            AllowOverride All
            Require all granted
            RewriteEngine on
            RewriteBase /
            RewriteCond %{REQUEST_FILENAME} !-f
            RewriteCond %{REQUEST_FILENAME} !-d
            RewriteRule ^(.*)$ index.php?q=$1 [L,QSA]
   </Directory>
</VirtualHost>
Save and close the file then activate the drupal9 site and enable the Apache rewrite module:
a2ensite drupal9
a2enmod rewrite
Next, restart the Apache service to apply the changes:
systemctl restart apache2
Access Drupal Installation Wizard
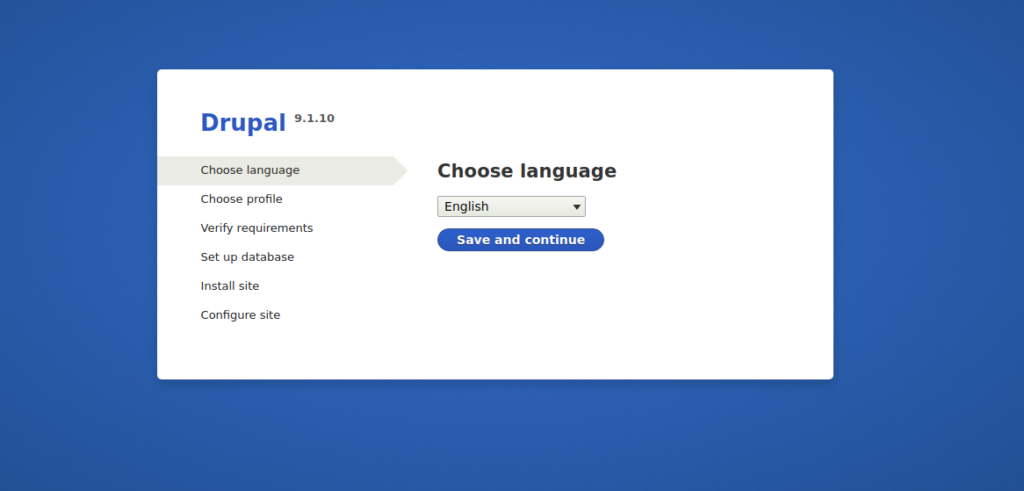
At this point, Drupal is installed and configured. Now, open your web browser and access the Drupal web installation wizard using the URL http://drupal9.example.com. You will be redirected to the Drupal installation wizard:
You can now follow the required steps to complete the Drupal web installation.
Congratulations! You have just installed and configured Drupal with Apache on your Ubuntu 20.04 Virtual Private Server. Thank you for following along in this How-To and check back with us for any new updates.
