Open-source Jenkins is one of the most widely used automation tools for building and managing applications. It supports all major programming languages including, Python, C++, PHP, etc. Jenkins is a Java-based tool used by developers to automate tasks in the software development cycle. It offers a large plugin library that helps you to make the necessary changes to applications before going into production.
In this post, we will show you how to install Jenkins on Fedora.
Step 1 – Install Java OpenJDK
Jenkins is written in Java, so Java JDK must be installed on your server. If not installed, you can install it easily using the following command.
dnf install java-17-openjdk -y
After the installation, verify the Java installation using the following command.
java --version
Output:
openjdk 17.0.3 2022-04-19
OpenJDK Runtime Environment 21.9 (build 17.0.3+7)
OpenJDK 64-Bit Server VM 21.9 (build 17.0.3+7, mixed mode, sharing)
Step 2 – Add Jenkins Repo
By default, Jenkins is not included in the Fedora default repo, so you will need to add the Jenkins repo to your server. You can install it with the following command.
wget -O /etc/yum.repos.d/jenkins.repo https://pkg.jenkins.io/redhat-stable/jenkins.repo
Output:
--2023-05-20 00:29:02--  https://pkg.jenkins.io/redhat-stable/jenkins.repo
Resolving pkg.jenkins.io (pkg.jenkins.io)... 151.101.2.133, 151.101.194.133, 151.101.130.133, ...
Connecting to pkg.jenkins.io (pkg.jenkins.io)|151.101.2.133|:443... connected.
HTTP request sent, awaiting response... 200 OK
Length: 85
Saving to: ‘/etc/yum.repos.d/jenkins.repo’

/etc/yum.repos.d/jenkins.repo             100%[=====================================================================================>]      85  --.-KB/s    in 0s

2023-05-20 00:29:02 (2.71 MB/s) - ‘/etc/yum.repos.d/jenkins.repo’ saved [85/85]
Next, import the Jenkins GPG key with the following command.
rpm --import https://pkg.jenkins.io/redhat-stable/jenkins.io-2023.key
Next, verify the added repo using the following command.
dnf repolist
Output:
repo id                                                                    repo name
fedora                                                                     Fedora 34 - x86_64
fedora-cisco-openh264                                                      Fedora 34 openh264 (From Cisco) - x86_64
fedora-modular                                                             Fedora Modular 34 - x86_64
jenkins                                                                    Jenkins-stable
updates                                                                    Fedora 34 - x86_64 - Updates
updates-modular                                                            Fedora Modular 34 - x86_64 - Updates
Step 3 – Install Jenkins
Now, you can install Jenkins using the DNF command line utility.
dnf install jenkins -y
Once the Jenkins is installed, start and enable the Jenkins service with the following command.
systemctl start jenkins
systemctl enable jenkins
You can now verify the status of Jenkins with the following command.
systemctl status jenkins
Output:
● jenkins.service - Jenkins Continuous Integration Server
     Loaded: loaded (/usr/lib/systemd/system/jenkins.service; disabled; vendor preset: disabled)
     Active: active (running) since Sat 2023-05-20 00:31:56 EDT; 16s ago
   Main PID: 3926 (java)
      Tasks: 51 (limit: 4666)
     Memory: 1.2G
        CPU: 47.408s
     CGroup: /system.slice/jenkins.service
             └─3926 /usr/bin/java -Djava.awt.headless=true -jar /usr/share/java/jenkins.war --webroot=/var/cache/jenkins/war --httpPort=8080

May 20 00:31:38 fedora jenkins[3926]: 8c1c142cc9fd44fc8297c0e8b881fed1
May 20 00:31:38 fedora jenkins[3926]: This may also be found at: /var/lib/jenkins/secrets/initialAdminPassword
May 20 00:31:38 fedora jenkins[3926]: *************************************************************
May 20 00:31:38 fedora jenkins[3926]: *************************************************************
May 20 00:31:38 fedora jenkins[3926]: *************************************************************
May 20 00:31:56 fedora jenkins[3926]: 2023-05-20 04:31:56.753+0000 [id=31]        INFO        jenkins.InitReactorRunner$1#onAttained: Completed initialization
May 20 00:31:56 fedora jenkins[3926]: 2023-05-20 04:31:56.789+0000 [id=24]        INFO        hudson.lifecycle.Lifecycle#onReady: Jenkins is fully up and running
May 20 00:31:56 fedora systemd[1]: Started Jenkins Continuous Integration Server.
May 20 00:31:56 fedora jenkins[3926]: 2023-05-20 04:31:56.946+0000 [id=48]        INFO        h.m.DownloadService$Downloadable#load: Obtained the updated data file for>
May 20 00:31:56 fedora jenkins[3926]: 2023-05-20 04:31:56.947+0000 [id=48]        INFO        hudson.util.Retrier#start: Performed the action check updates server succ>
Step 4 – Access Jenkins Web Interface
At this point, Jenkins is installed and listening on port 8080. You can verify it with the following command.
ss -antpl | grep 8080
Output.
LISTEN 0 50 *:8080 *:* users:(("java",pid=3926,fd=9))
Next, retrieve the Jenkins initial admin password with the following command.
cat /var/lib/jenkins/secrets/initialAdminPassword
Output:
8c1c142cc9fd44fc8297c0e8b881fed1
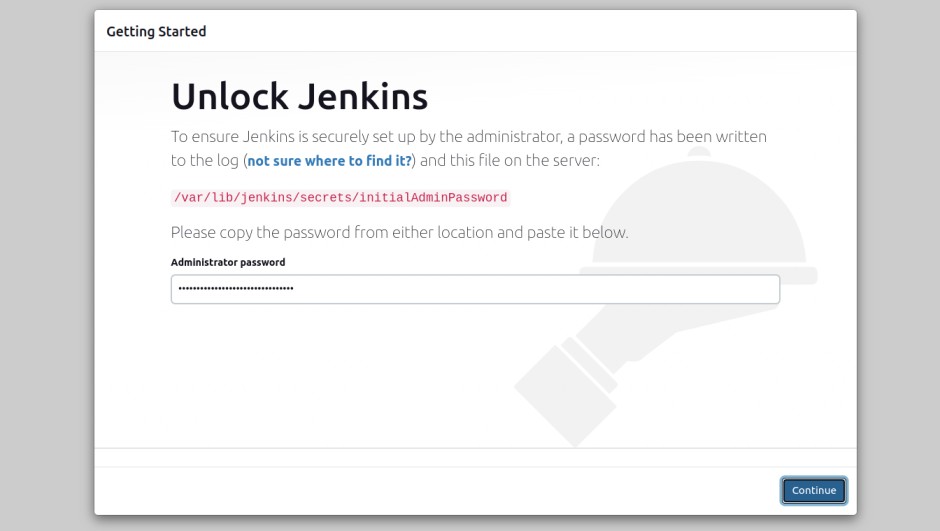
Now, open your web browser and access the Jenkins web interface using the URL http://your-server-ip:8080. You should see the Jenkins initial password screen.
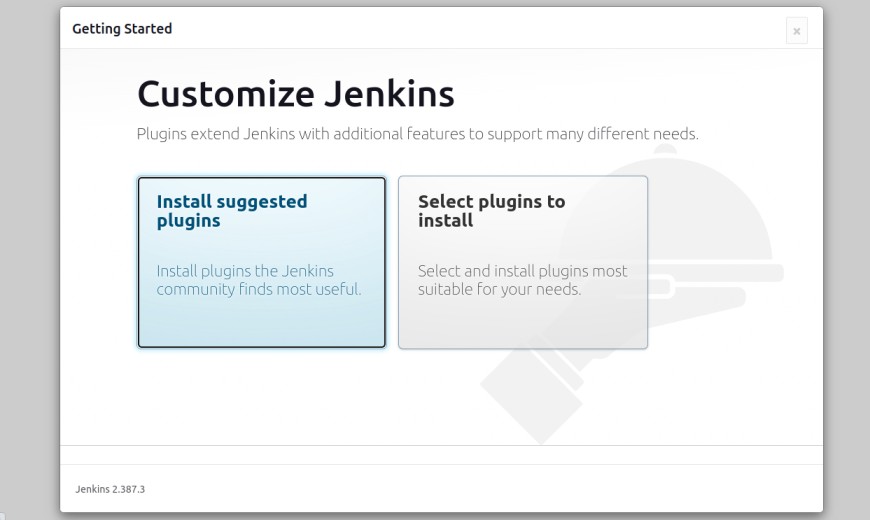
Provide your password and click on the Continue button. You should see the following screen.
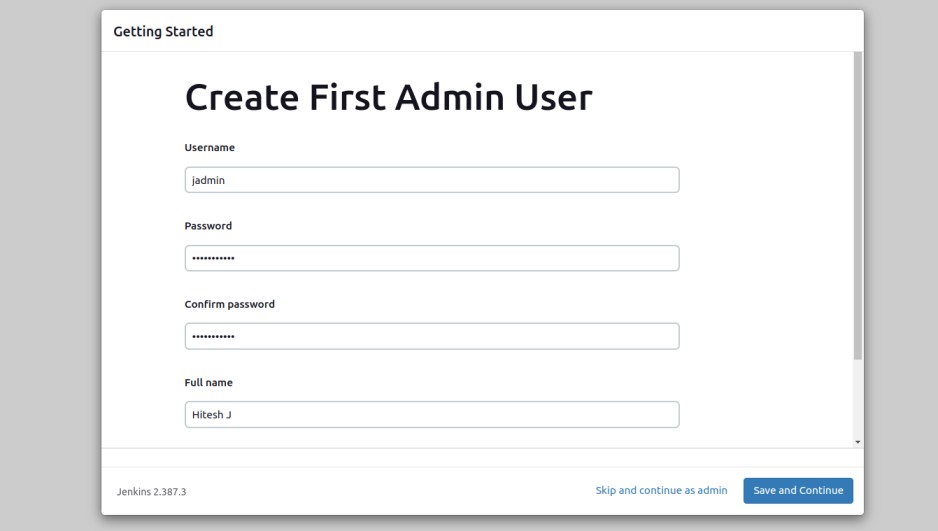
Click on the Install suggested plugins. You should see the following screen.
Define your admin user, password, and email, and click on the Save and Finish button. You should see the following screen.
Define your Jenkins URL and click on the Start using Jenkins button. You should see the Jenkins dashboard on the following screen.
Conclusion
In this tutorial, we showed you how to install Jenkins on Fedora. You can now implement Jenkins in your development team to streamline the software development process. Try to install and implement Jenkins on VPS hosting from Atlantic.Net!


