phpBB is a free, open-source, easy-to-use, simple, customizable, and powerful flat-forum bulletin board software. It is written in the PHP scripting language and used by many popular discussion forums on the Internet. It supports all major database systems including MySQL, PostgreSQL, Oracle, and SQLite. It comes with a lot of style and image packages to customize your board and allows you to create a very unique forum in minutes. With phpBB, you can create a discussion forum where people can post topics and other people can reply to those topics.
In this post, we will show you how to install phpBB with LEMP on Oracle Linux 8.
Step 1 – Install LEMP Stack
Before installing the LEMP server, you will need to install the EPEL repository on your server. You can install it using the following command:
dnf install epel-release -y
Next, install the Nginx server with the following command:
dnf install nginx -y
Once the Nginx package is installed, start and enable the Nginx service with the following command:
systemctl start nginx
systemctl enable nginx
Next, it is a good idea to install the latest version of MariaDB on your server.
To do so, first reset the MariaDB default repository and enable the latest repository:
dnf module reset mariadb
dnf module enable mariadb:10.5 -y
Next, install the latest version of MariaDB server with the following command:
dnf install mariadb-server -y
Once MariaDB is installed, start and enable the MariaDB service with the following command:
systemctl start mariadb
systemctl enable mariadb
Next, install the Remi PHP repository with the following command:
dnf install dnf-utils http://rpms.remirepo.net/enterprise/remi-release-8.rpm
Next, reset the PHP default repository and enable the PHP 8.0 repository with the following command:
dnf module reset php -y
dnf module enable php:remi-8.0 -y
Next, install the PHP, PHP-FPM, and other packages with the following command:
dnf install php php-mysqli php-fpm -y
Once all the packages are installed, edit the php.ini file and change the default settings:
nano /etc/php.ini
Change the following values:
max_execution_time = 180
max_input_time = 90
memory_limit = 256M
upload_max_filesize = 64M
Save and close the file, then edit the PHP-FPM configuration file:
nano /etc/php-fpm.d/www.conf
Change the user and group from apache to nginx:
user = nginx
group = nginx
Save and close the file, then start the PHP-FPM service and enable it to start at system reboot:
systemctl start php-fpm
systemctl enable php-fpm
Step 2 – Create a Database for phpBB
phpBB uses a MariaDB as a database backend, so you will need to create a database and user for phpBB.
First, log in to the MariaDB shell with the following command:
mysql
Once you are logged in, create a database and user with the following command:
CREATE DATABASE phpbb;
CREATE USER 'phpbbuser'@'localhost' IDENTIFIED BY 'password';
Next, grant all the privileges to the phpbb database with the following command:
GRANT ALL ON phpbb.* TO 'phpbbuser'@'localhost' IDENTIFIED BY 'password' WITH GRANT OPTION;
Next, flush the privileges to apply the changes:
FLUSH PRIVILEGES;
Next, exit from the MariaDB shell with the following command:
EXIT;
Step 3 – Install phpBB
Next, visit the phpBB official download page and download the latest version of phpBB with the following command:
wget https://download.phpbb.com/pub/release/3.3/3.3.7/phpBB-3.3.7.zip
Once the download is completed, unzip the downloaded file with the following command:
unzip phpBB-3.3.7.zip
Next, move the extracted directory to the Nginx web root directory:
mv phpBB3 /var/www/html/phpbb
Next, set proper permissions and ownership with the following command:
chown -R nginx:nginx /var/www/html/phpbb
chmod -R 755 /var/www/html/phpbb
Step 4 – Configure Nginx for phpBB
Next, you will need to create an Nginx virtual host configuration file to host phpBB on the internet.
nano /etc/nginx/conf.d/phpbb.conf
Add the following lines:
server {
   listen 80;
   server_name phpbb.example.com;
   root /var/www/html/phpbb;
   index index.php index.html index.htm;

    access_log /var/log/nginx/phpbb-access.log;
    error_log /var/log/nginx/phpbb-error.log;

location / {
	try_files $uri $uri/ @rewriteapp;

	# Pass the php scripts to FastCGI server specified in upstream declaration.
	location ~ \.php(/|$) {
		include fastcgi.conf;
                fastcgi_pass unix:/run/php-fpm/www.sock;
		fastcgi_split_path_info ^(.+\.php)(/.*)$;
		fastcgi_param PATH_INFO $fastcgi_path_info;
		fastcgi_param SCRIPT_FILENAME $realpath_root$fastcgi_script_name;
		fastcgi_param DOCUMENT_ROOT $realpath_root;
		try_files $uri $uri/ /app.php$is_args$args;
		fastcgi_intercept_errors on;
	}

	# Deny access to internal phpbb files.
	location ~ /(config\.php|common\.php|cache|files|images/avatars/upload|includes|(?<!ext/)phpbb(?!\w+)|store|vendor) {
		deny all;
		# deny was ignored before 0.8.40 for connections over IPv6.
		# Use internal directive to prohibit access on older versions.
		internal;
	}
}

location @rewriteapp {
	rewrite ^(.*)$ /app.php/$1 last;
}

# Correctly pass scripts for installer
location /install/ {
	try_files $uri $uri/ @rewrite_installapp =404;

	# Pass the php scripts to fastcgi server specified in upstream declaration.
	location ~ \.php(/|$) {
		include fastcgi.conf;
                fastcgi_pass unix:/run/php-fpm/www.sock;
		fastcgi_split_path_info ^(.+\.php)(/.*)$;
		fastcgi_param PATH_INFO $fastcgi_path_info;
		fastcgi_param SCRIPT_FILENAME $realpath_root$fastcgi_script_name;
		fastcgi_param DOCUMENT_ROOT $realpath_root;
		try_files $uri $uri/ /install/app.php$is_args$args =404;
		fastcgi_intercept_errors on;
	}
}

location @rewrite_installapp {
	rewrite ^(.*)$ /install/app.php/$1 last;
}

# Deny access to version control system directories.
location ~ /\.svn|/\.git {
	deny all;
	internal;
}

 gzip on;
 gzip_comp_level 6;
 gzip_min_length 1000;
 gzip_proxied any;
 gzip_disable "msie6";
 gzip_types
     application/atom+xml
     application/geo+json
     application/javascript
     application/x-javascript
     application/json
     application/ld+json
     application/manifest+json
     application/rdf+xml
     application/rss+xml
     application/xhtml+xml
     application/xml
     font/eot
     font/otf
     font/ttf
     image/svg+xml
     text/css
     text/javascript
     text/plain
     text/xml;

  # assets, media
  location ~* \.(?:css(\.map)?|js(\.map)?|jpe?g|png|gif|ico|cur|heic|webp|tiff?|mp3|m4a|aac|ogg|midi?|wav|mp4|mov|webm|mpe?g|avi|ogv|flv|wmv)$ {
      expires    90d;
      access_log off;
  }

  # svg, fonts
  location ~* \.(?:svgz?|ttf|ttc|otf|eot|woff2?)$ {
      add_header Access-Control-Allow-Origin "*";
      expires    90d;
      access_log off;
  }
}
Save and close the file, then edit the Nginx main configuration file:
nano /etc/nginx/nginx.conf
Add the following line below http {:
server_names_hash_bucket_size 64;
Save and close the file, then restart the Nginx service to apply the changes:
systemctl restart nginx
Step 5 – Access phpBB Web Interface
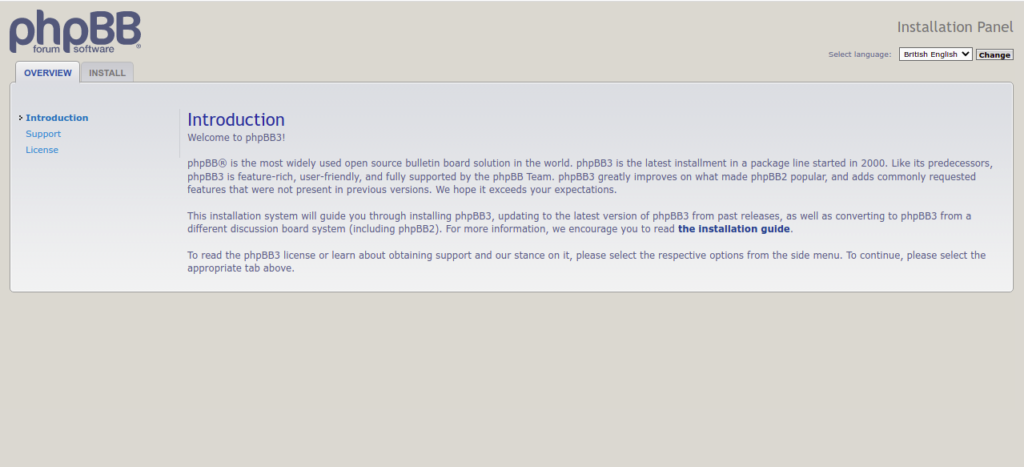
Now, open your web browser and access the phpBB web interface using the URL http://phpbb.example.com. You should see the following page:
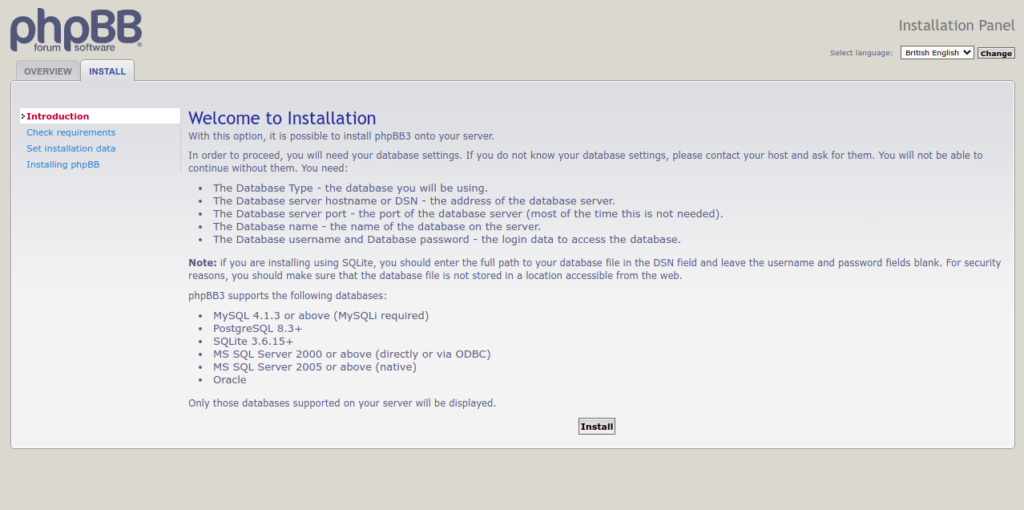
Click on the INSTALL tab. You should see the following page:
Next, click on the Install button. You should see the following page:
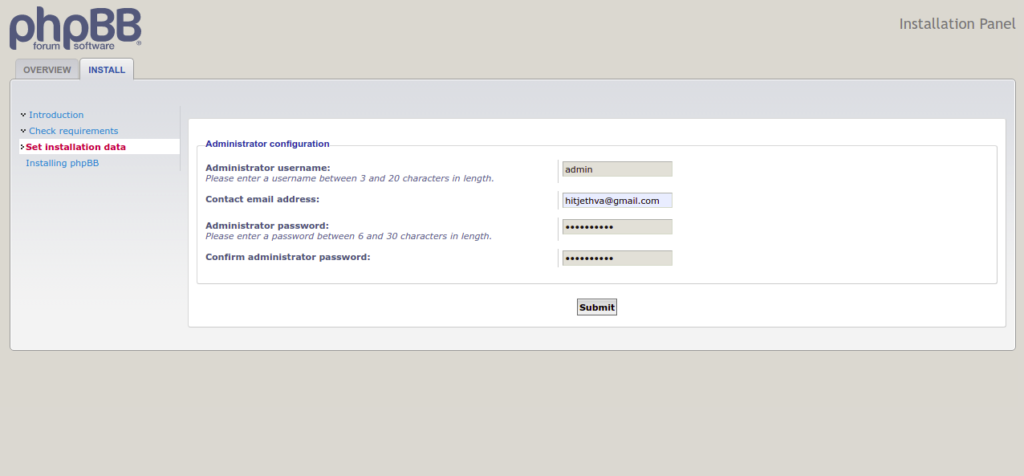
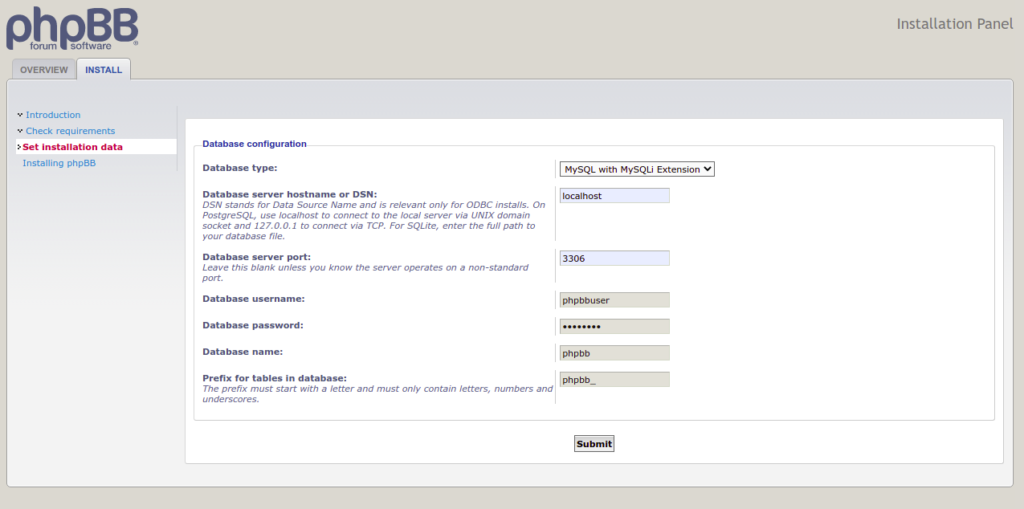
Provide your admin username and password and click on the Submit button. You should see the database configuration page:
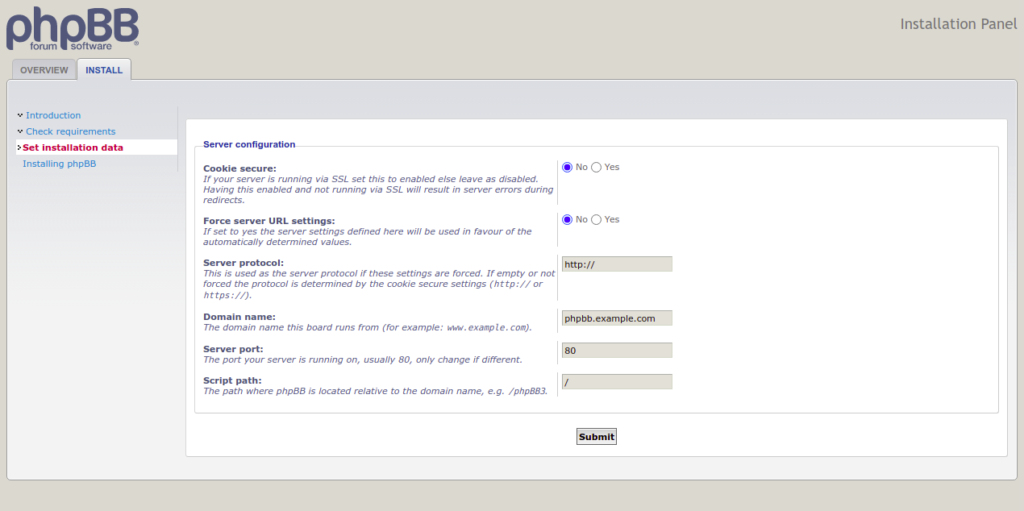
Provide your database name, database username, and password and click on the Submit button. You should see the server configuration page:
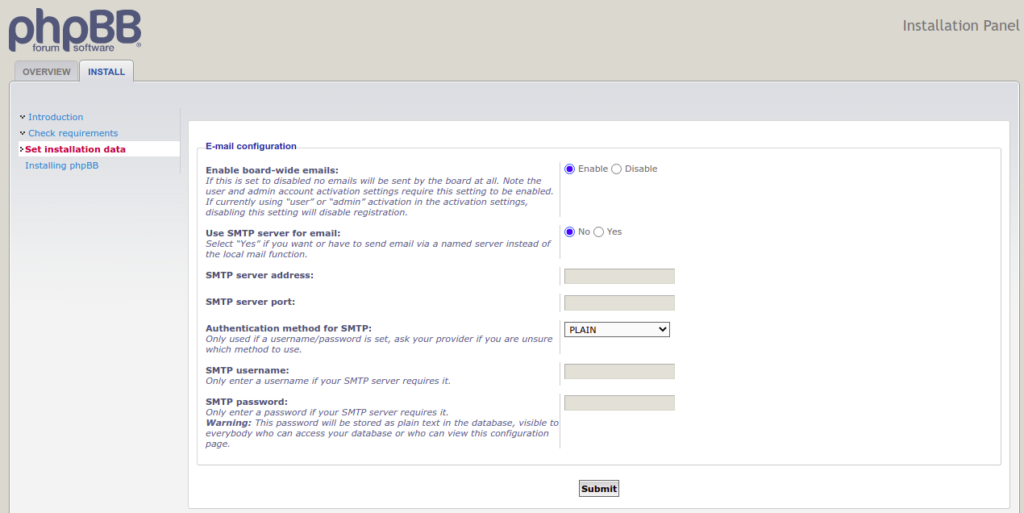
Provide your domain name and port and click on the Submit button. You should see the Email configuration page:
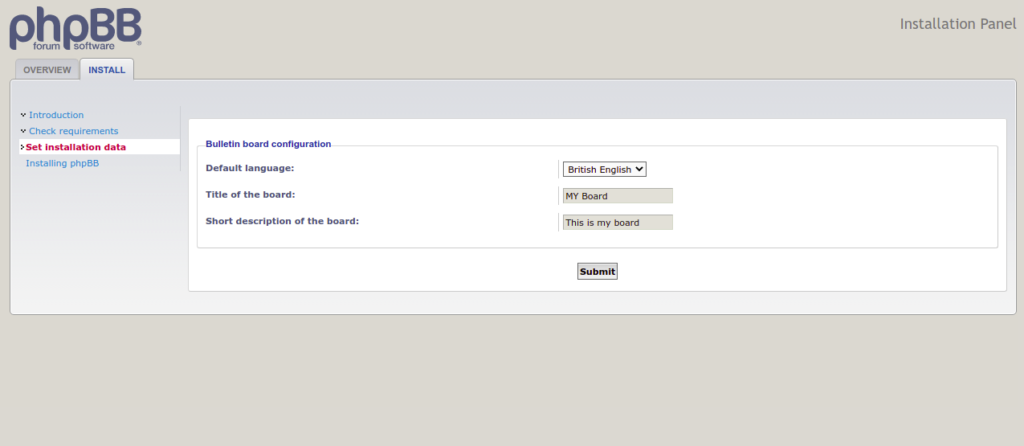
Provide your SMTP configuration and click on the Submit button. You should see the board configuration page:
Provide your board name and a short description and click on the Submit button. Once the installation has been completed successfully, you should see the following page:
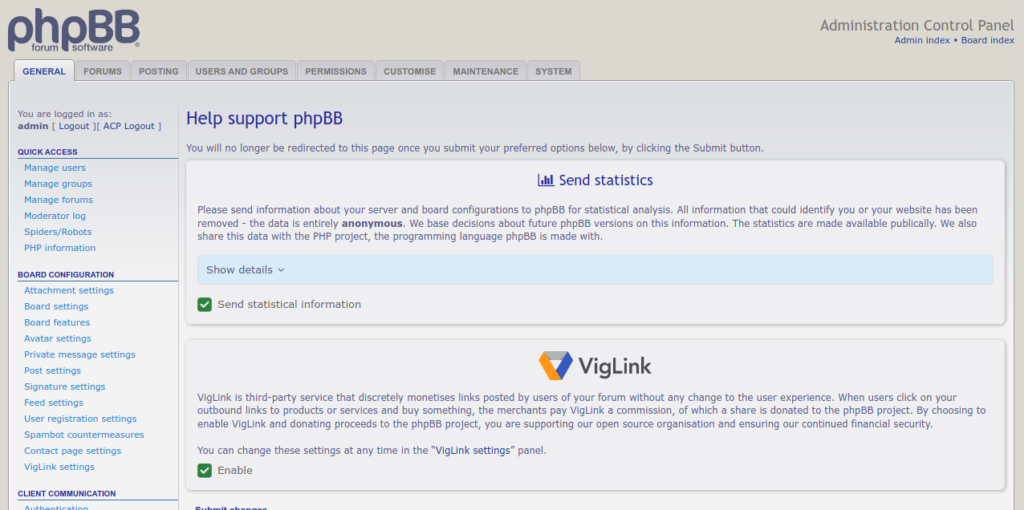
Click on the Take me to the ACP. You should see the phpBB dashboard:
Conclusion
In this post, we explained how to install and configure phpBB with LEMP on Oracle Linux 8. You can now start creating your own forum, create a topic, and share ideas with others. Try it on VPS hosting from Atlantic.Net!
