WildFly, also known as JBoss, is an open-source and lightweight application server for building Java applications. It is cross-platform and offers a web-based interface that makes managing and configuring WildFly via a web browser easier. It is based on pluggable subsystems and is designed to provide users with a fast and stable Java runtime environment.
This post will show you how to install WildFly on Fedora.
Step 1 – Install Java OpenJDK
WildFly is a Java-based application, so Java JDK must be installed on your server. You can install it with the following command.
dnf install java-11-openjdk.x86_64
Once Java JDK is installed, you can verify the Java installation using the following command.
java --version
You will see the following output.
openjdk 11.0.15 2022-04-19
OpenJDK Runtime Environment 18.9 (build 11.0.15+10)
OpenJDK 64-Bit Server VM 18.9 (build 11.0.15+10, mixed mode, sharing)
Step 2 – Install WildFly and Configure
First, visit the WildFly official website, copy the URL of the latest WildFly version, and download it using the following command.
wget https://github.com/wildfly/wildfly/releases/download/28.0.0.Final/wildfly-28.0.0.Final.zip
Once WildFly is downloaded, unzip the downloaded file with the following command.
unzip wildfly-28.0.0.Final.zip
Next, move the extracted directory to /opt.
mv wildfly-28.0.0.Final /opt/wildfly
Next, create a user and group for WildFly with the following command.
groupadd --system wildfly
useradd -s /sbin/nologin --system -d /opt/wildfly  -g wildfly wildfly
Next, create a WildFly configuration directory and copy all necessary files inside that directory.
mkdir /etc/wildfly
cp /opt/wildfly/docs/contrib/scripts/systemd/wildfly.conf /etc/wildfly/
cp /opt/wildfly/docs/contrib/scripts/systemd/wildfly.service /etc/systemd/system/
cp /opt/wildfly/docs/contrib/scripts/systemd/launch.sh /opt/wildfly/bin/
Next, change the permissions and ownership of the wildfly directory.
chmod +x /opt/wildfly/bin/launch.sh
chown -R wildfly:wildfly /opt/wildfly
Step 3 – Start WildFly Server
At this point, WildFly is installed and configured. Now, reload the systemd daemon using the following command.
systemctl daemon-reload
Next, start and enable the WildFly service with the following command.
systemctl start wildfly
systemctl enable wildfly
You can now check the status of WildFly using the following command.
systemctl status wildfly
You will get the following output.
● wildfly.service - The WildFly Application Server
     Loaded: loaded (/etc/systemd/system/wildfly.service; disabled; vendor preset: disabled)
     Active: active (running) since Sun 2023-05-07 03:40:18 EDT; 6s ago
   Main PID: 35612 (launch.sh)
      Tasks: 63 (limit: 4666)
     Memory: 174.3M
        CPU: 9.503s
     CGroup: /system.slice/wildfly.service
             ├─35612 /bin/bash /opt/wildfly/bin/launch.sh standalone standalone.xml 0.0.0.0
             ├─35613 /bin/sh /opt/wildfly/bin/standalone.sh -c standalone.xml -b 0.0.0.0
             └─35709 java -D[Standalone] -Xms64m -Xmx512m -XX:MetaspaceSize=96M -XX:MaxMetaspaceSize=256m -Djava.net.preferIPv4Stack=true -Djboss.modules.system.pkgs=o>
By default, WildFly listens on port 8080. You can check it with the following command.
ss -tunelp | grep 8080
Output.
tcp LISTEN 0 4096 0.0.0.0:8080 0.0.0.0:* users:(("java",pid=35709,fd=496)) uid:993 ino:56961 sk:1003 cgroup:/system.slice/wildfly.service <->
Now, open your web browser and access the WildFly test page using the URL http://your-server-ip:8080. You will see the WildFly test page on the following screen.
Step 4 – Create an Administrator User
Next, you must add an admin user to access the WildFly admin interface. You can create it with the following command.
/opt/wildfly/bin/add-user.sh
You should see the following output.
What type of user do you wish to add?
 a) Management User (mgmt-users.properties)
 b) Application User (application-users.properties)
(a):
Just press the Enter key to create a management user. You will be asked to define your username and password:
Enter the details of the new user to add.
Using realm 'ManagementRealm' as discovered from the existing property files.
Username : adminuser
Password recommendations are listed below. To modify these restrictions edit the add-user.properties configuration file.
 - The password should be different from the username
 - The password should not be one of the following restricted values {root, admin, administrator}
 - The password should contain at least 8 characters, 1 alphabetic character(s), 1 digit(s), 1 non-alphanumeric symbol(s)
Password :
Re-enter Password :
What groups do you want this user to belong to? (Please enter a comma separated list, or leave blank for none)[  ]:
About to add user 'adminuser' for realm 'ManagementRealm'
Is this correct yes/no? yes
Added user 'adminuser' to file '/opt/wildfly/standalone/configuration/mgmt-users.properties'
Added user 'adminuser' to file '/opt/wildfly/domain/configuration/mgmt-users.properties'
Added user 'adminuser' with groups  to file '/opt/wildfly/standalone/configuration/mgmt-groups.properties'
Added user 'adminuser' with groups  to file '/opt/wildfly/domain/configuration/mgmt-groups.properties'
Step 5 – Allow WildFly Remote Access
By default, the WildFly admin interface can be accessed only from the local host, so you must edit the WildFly startup script file and enable the remote access.
nano /opt/wildfly/bin/launch.sh
Change the following lines:
if [[ "$1" == "domain" ]]; then
    $WILDFLY_HOME/bin/domain.sh -c $2 -b $3
else
    $WILDFLY_HOME/bin/standalone.sh -c $2 -b $3 -bmanagement=0.0.0.0
fi
Save and close the file, then restart the WildFly service to apply the changes.
systemctl restart wildfly
Step 6 – Access WildFly Admin Interface
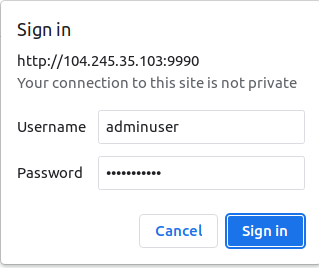
Now, open your web browser and access the WildFly admin interface using the URL http://your-server-ip:9990. You should see the WildFly login page.
Provide your admin username, password and click on the Login button. You should see the WildFly dashboard on the following screen.
Conclusion
In this post, we explained how to install WildFly on Fedora. You can now build and deploy a Java application in the production environment. Try to install WildFly on dedicated server hosting from Atlantic.Net!


