Table of Contents
Introduction
In this tutorial, we will be covering how to perform some basic IPTables changes that will greatly help secure your server. This is done on a fresh install of Ubuntu 14.04 64bit in our Cloud. This can also be done on any version of our Ubuntu 12.04 OS as well as Debian. All of our commands are run as root and file editing is done via vi. If you are using another user to do this, you will need sudo access. You may use any file editor you would like.
Securing your Cloud server with IPTables
Unfortunately, our Ubuntu 14.04 or 12.04 do not come with IPTables installed already. In Debian, IPTables is already installed so you may skip this. So our first step with Ubuntu is to install IPTables. To do this, simply run:
apt-get install iptables
After installing IPTables, you can check it out by running:
iptables –L
This will list out any rules you have running and verifies for you that you did install iptables and it is working. At this time, it’s just empty but you can see the three types of chains available.
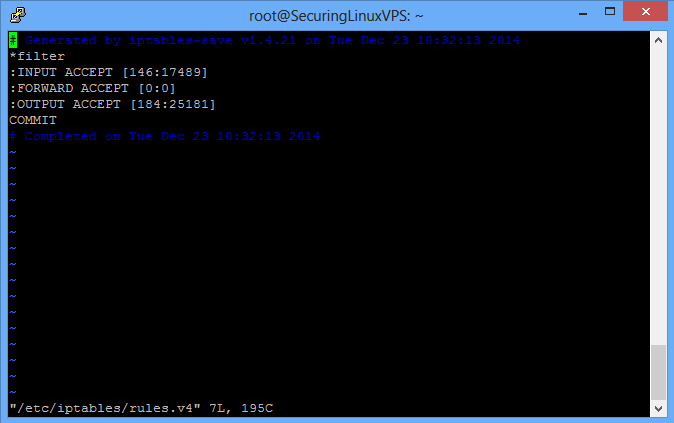
Next, we will install the iptables-persistent package. What this does is it will write out our current IPTables rules to a new file (/etc/iptables/rules.v4) and it will handle automatically applying our rules upon reboot. Pretty helpful!

/etc/iptables/rules.v4
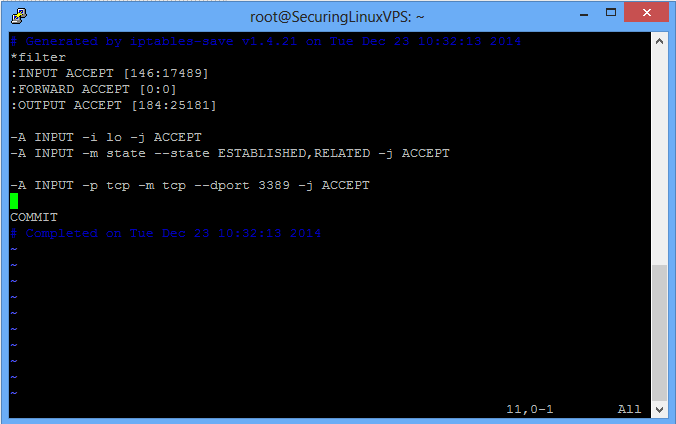
When you enter the file, it should look like the above picture. There are a few things that we will want to add before our first custom rule. This would be a rule for the loopback interface and one for traffic that is already established. You can see these below. The first custom rule we are going to add will allow SSH access to our server. We’ll want to add the rules above the COMMIT line as COMMIT delimits the end of our INPUT, FORWARD, and OUTPUT ruleset. To find out what all the IPTables segments mean and more information about them, please see our IPTables section.
-A INPUT -i lo -j ACCEPT
-A INPUT -m state --state ESTABLISHED,RELATED -j ACCEPT
-A INPUT -p tcp -m tcp --dport 22 -j ACCEPT
Note: If you have a custom SSH port like we set up in the Changing your SSH Port in Ubuntu tutorial, you will have to change the 22 to be your SSH port you configured. In our case 3389

/etc/iptables/rules.v4
Your rules should look similar to the above picture. Now before we finish here, there’s two more things we have to change. Where the rules say:
:INPUT ACCEPT and :FORWARD ACCEPT
We will want to make them have:
:INPUT DROP and :FORWARD DROP
What this does is it tells IPTables to block and drop all traffic that is not going to ports you specify to allow through. This will stop people trying to break in using services that you have running unless you have opened those ports to the public.
When you’re finished, it should look similar to the above. Once there, just save the file and close it. The last thing we have to do is load these new rules into the current IPTables. To do this, you simply run:
iptables-restore < /etc/iptables/rules.v4
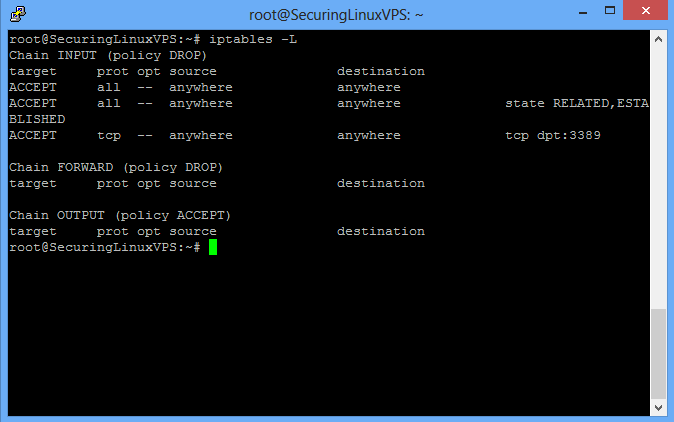
To verify our rules are in place, simply run the same command from earlier:
iptables –L
You should see something similar to the below page.

/etc/iptables/rules.v4
After this, that’s it! Your new rules are in effect immediately, and they’ll remain through reboots. If you want to get more restrictive with your IPtables, specifically access to SSH, you can do the following for each IP address that should be allowed through. This involves editing the SSH rule and adding more. Where it states the SSH rule we identified earlier, you want to change it to be:
-A INPUT -s IPADDR –m tcp –p tcp --dport 3389 –j ACCEPT
Where IPADDR is your IP address that you want to have SSH access to your server. If you did not set up a custom SSH port, you would want that to remain 22 and not 3389.
To allow specific ports through say for web access to your website, all you need to do is know/find the port the service runs on (or you configured it on) and it’s protocol (TCP or UDP) and allow it through. For example, website access:
-A INPUT -m tcp -p tcp --dport 80 -j ACCEPT
And now the Internet has access to the web hosting you are doing.
Keep in mind, when adding new rules to either INPUT or FORWARD sections, it is a great practice to keep the new rules lumped together with like rules. INPUTs with INPUTs and FORWARDs with FORWARDs. You will also want to make sure that any rules you add that allow a new port through are listed ABOVE any reject statements for that rule set. If they are listed after any reject lines, the rules will not take effect.
To see output of what IPTables is doing and/or blocking with its rules, you can run the below. It will print out the rules you have and anything packet wise about dropping connections or allowing them through.
iptables -L -vn
To find out what all the IPTables segments mean and more information about them, please see our IPTables section (link).
Note: If using Atlantic.Net Cloud Services, You can always access your server via our VNC viewer in the Cloud Portal if you lock yourself out.